We may earn revenue from the product usable on this page and participate in affiliate platform . Learn More ›
Over clip , tile grout stains , fissure , and becomes open . If you ’re noticing that your tile grout has determine better days , it ’s probably time torepair or substitute it . The good word is that grout haunt is an leisurely and budget - friendly fix to promptly update the look of kitchen or bathroom tile . discredited grout can not only make your roofing tile look quondam and raddled , but it can also be a breeding primer coat for bacterium and mildew growth . Grout repair requires a few specialty peter , such as a grout saw and a grout swim bladder , but it also necessitates some commonly possess ones , such as eye protection , a shop class vacuum , gloves , towels , and a scrub pad .
metre required:1 to 3 days , including drying timeDifficulty : BeginnerEstimated cost:$180 to $ 420 , bet on size of the area
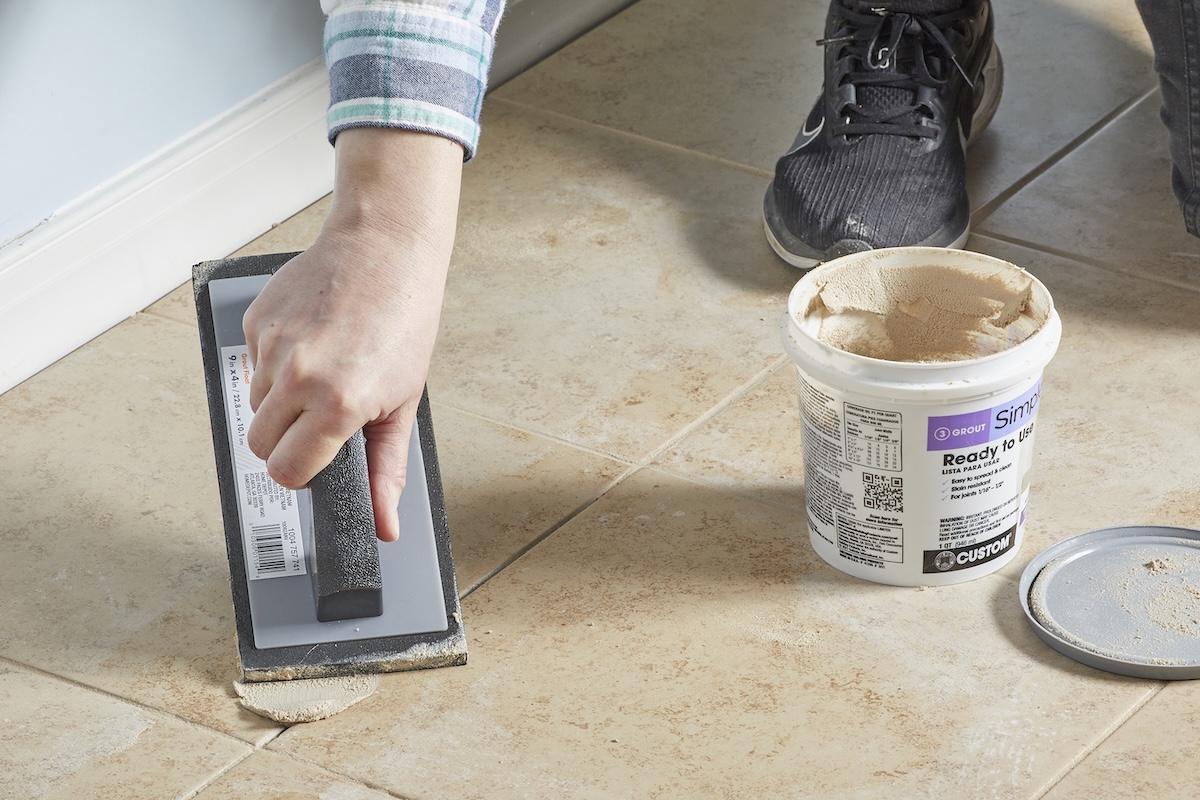
Photo: Tom Fenenga for Bob Vila
Tools & Materials
Bobvila.com may earn a commission from purchases made through these links .
Before You Begin
A very of import first step is clean the grout before removing the cracked or loose opus . This agency , you may match the colour of the be grout with the replacement grout .
Tip for Grout Repair
Safety Considerations
Other Considerations
Grout Repair Instructions
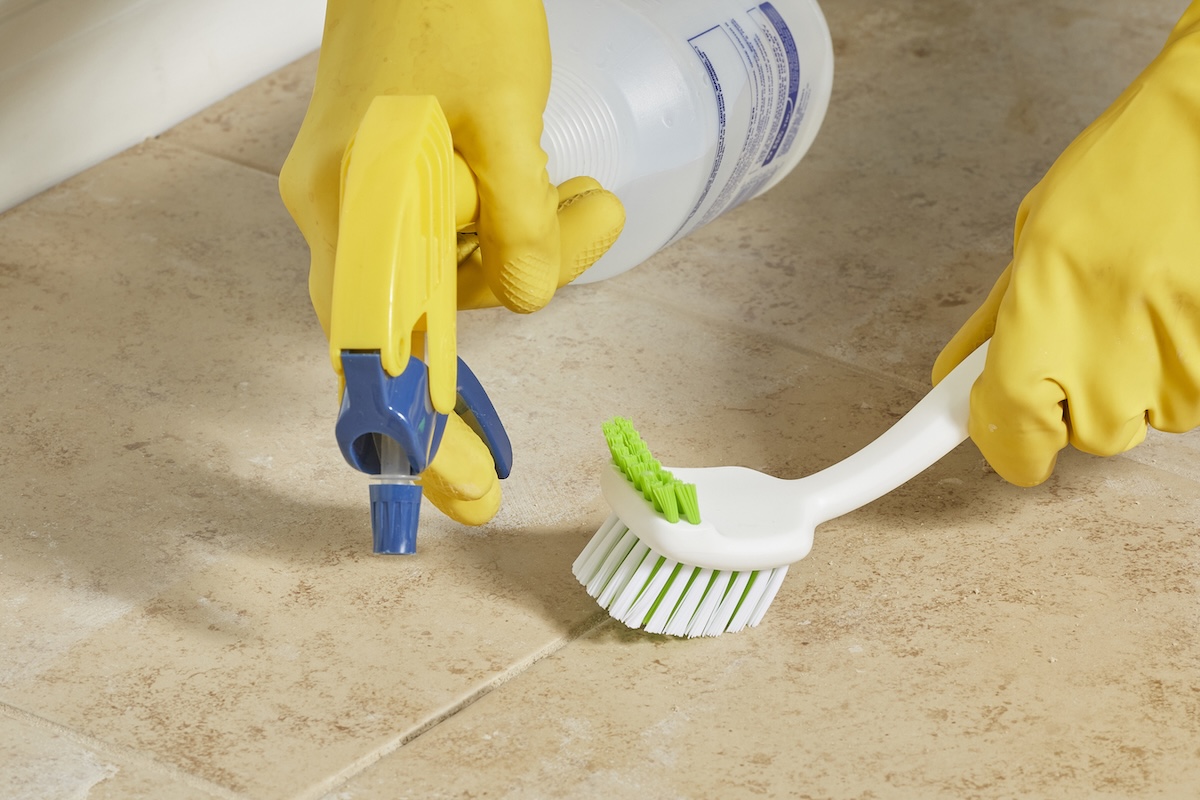
Step 1: Clean the broken grout with a white vinegar and water solution.
immix one part white acetum and one part water in a bowl or bucket . Then , dip a clean toothbrush or scrub clash in the mixture and scrub up the damage grout until all the dirt and grime comes off . Wipe away the excess mixture with a cloth .
Step 2: Buy new grout that matches your existing grout color.
To retrieve the close color match , apply sample grout chip , which are available from most home advance computer memory . If the original grout color is light than the color you choose from the chips , lighten up the new grout by adding more piddle when you mix it . If the original grout color is darker , utilize less water . Grout is available as sanded or unsanded . Choose the right character of grout ( detail below ) based on the breadth of the roofing tile roast , the location of the repair , and the case of tile .
Acrylic latex grout is comparatively loose to mould with , but it requires sealing . epoxy resin grout is highly resistant to mark and does n’t need sealing , but it ’s more difficult to apply . you’re able to grease one’s palms grout powder and mix it yourself , or you’re able to purchase premixed grout .
Step 3: With a grout saw, remove the top ⅛ inch of the damaged grout.
A grout saw is a pocket-size , handheld blade that jibe between the tile . Use a grout saw that has a blade with a breadth that will fit between the tiles you ’re working on . Place the grout saw over the damaged grout and move it back and forward , like you ’re scrubbing away the old grout ( but be thrifty not to chip the tile ) . Continue until the top layer ( about ⅛ column inch ) of the damaged grout has been broken up into pieces . Another option is to expend a reciprocating saw with a grout remover appurtenance for quick and comfortable remotion . To foreclose any discomfort or avoid wellness issues related to grout mote , you ’ll want to wear a junk mask and eye protection while you ’re move out the old grout .
Step 4: Vacuum the remaining grout particles.
Use the hose attachment on your workshop vacuum cleaner to make certain all the pieces of the quondam grout are cleared out of the gap between the tile . This help to see how deep you ’ve gone and assess how much far you involve to continue removing the old grout .
Step 5: Wet the tile.
Before you could move along in the grout repair process and enforce any new grout , you need to give your surface a thorough cleanup . Going over the grout lines again with a vacuum and wiping down the roofing tile with a cushy fuddled grout sponge should be all that you really involve to do to prep for the new grout . Use a newspaper towel to assimilate any water that puddles in the joints . For epoxy glue grout , make certain the tile is altogether ironical before app .
Step 6: Apply the grout. Use the grout float to fill the gaps with the mixture.
A grout float is a thick rubber pad with a handgrip that you may get hold at most home betterment entrepot . lift out some of the grout mix out of the bucket using the cushioned part of the grout float . Be generous , and press the mixture down into the opening you ’re repairing until it ’s completely fill . Do n’t worry if grout gets on the surrounding tiles — you’ll be able-bodied to clean it off afterward . If you ’re using epoxy grout , a nonstick gumwood - galosh float works the best .
Step 7: Remove the excess grout.
Hold the float so it ’s at a 45 - degree slant with the floor . lento drag the bound of the float over the gap you filled to scrape up the excess grout and make the grout affluent with the rest of the floor . Make certain the joints are entirely filled .
Step 8: Let the grout set. Let it dry for 30 minutes and use a damp sponge to remove the residue.
Step 9: Apply a sealant.
If using acrylic latex grout , apply a sealant after the grout dry out entirely .
Grout fixture is an effective and cost - good way to refresh old , raddled , and damage roofing tile grout . Remember to endure prophylactic glasses and a junk masquerade to protect yourself from getting grout chips in your eyes and to forestall breathing in grout dust . To keep the grout repair project look like new , use a roofing tile grout cleaner to like for your Modern grout . If the grout continues to knap or break through after you amend it , the tile underlayment may be odd or exposed to moisture . In this case , you may want to have a professional check the carpet pad and resort it if necessary . If grout haunt seems too time- and effort - intensive , or if you are sincerely a novice , you may also want to hire a master to do the work for you .
This Is the Year for a Kitchen Renovation
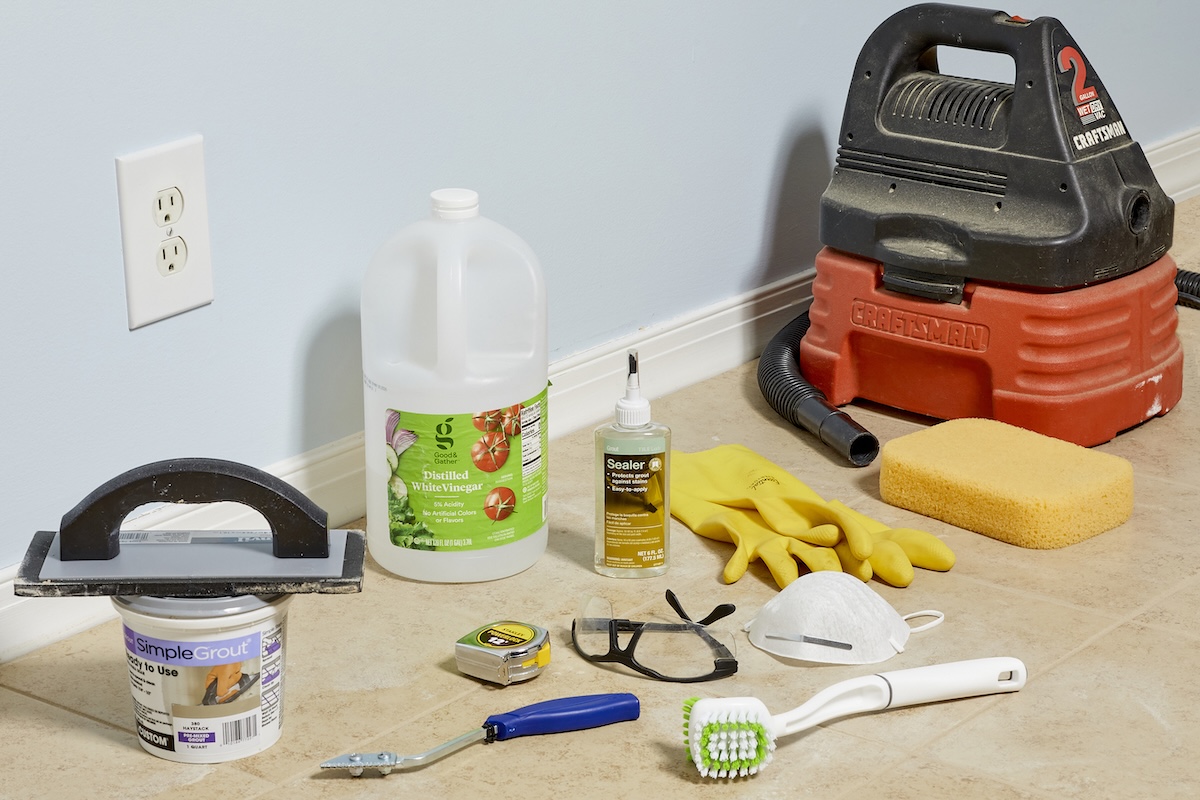
Photo: Tom Fenenga for Bob Vila
Whether you ’re selling or staying , everyone can get something out of a kitchen update . watch why we consider this restoration the Most Valuable Project of 2025 and how to stay on budget .
Photo; Tom Fenenga for Bob Vila
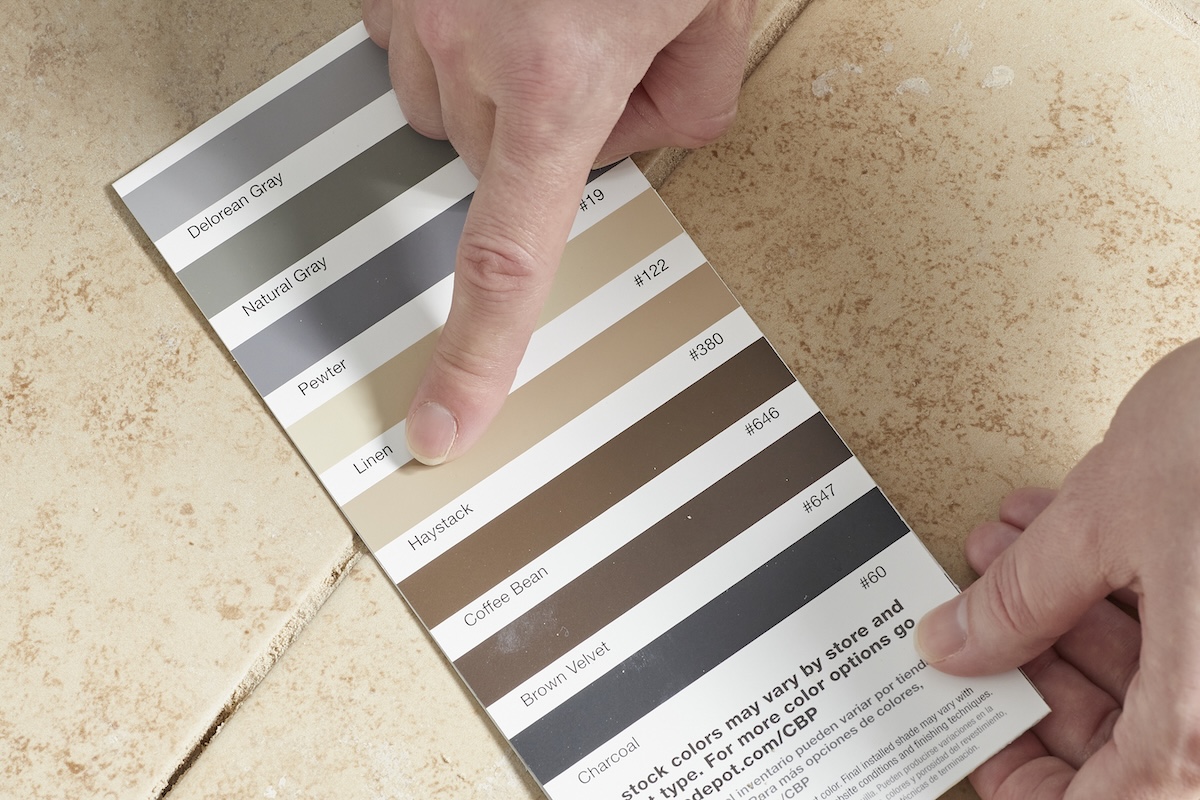
Photo: Tom Fenenga for Bob Vila
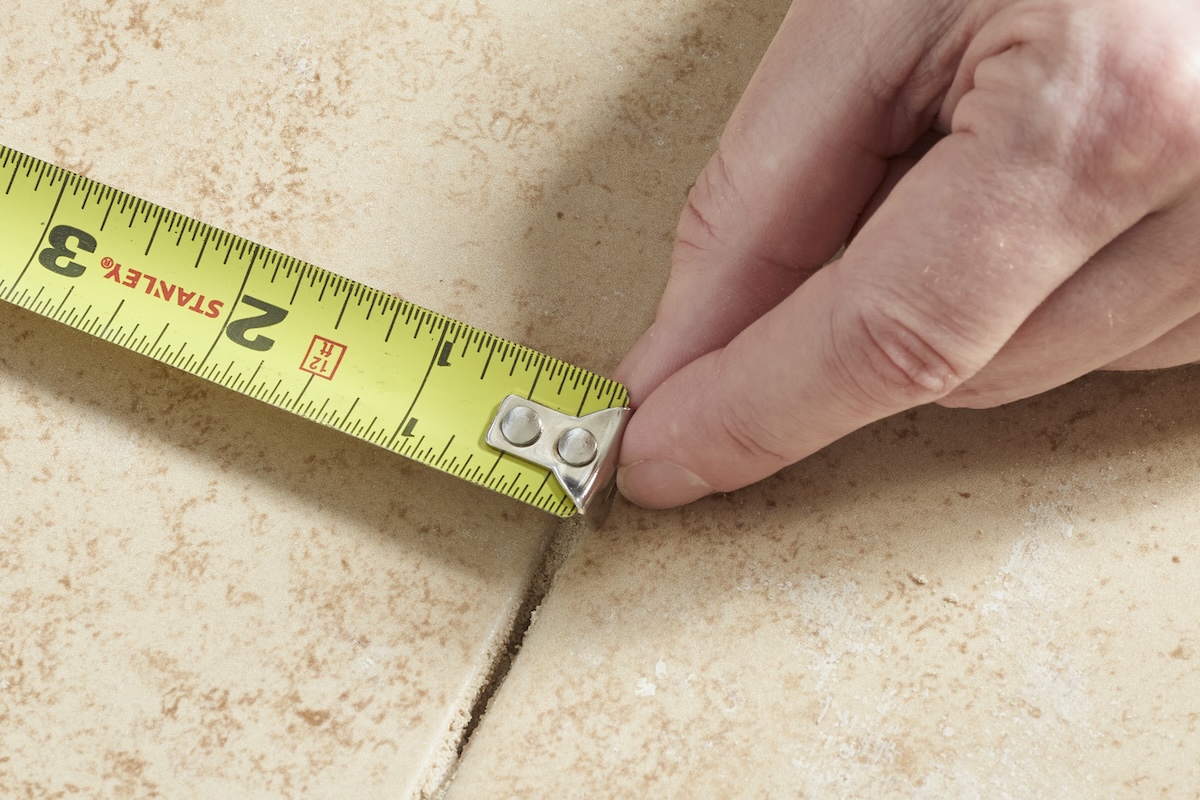
Photo: Tom Fenenga for Bob Vila
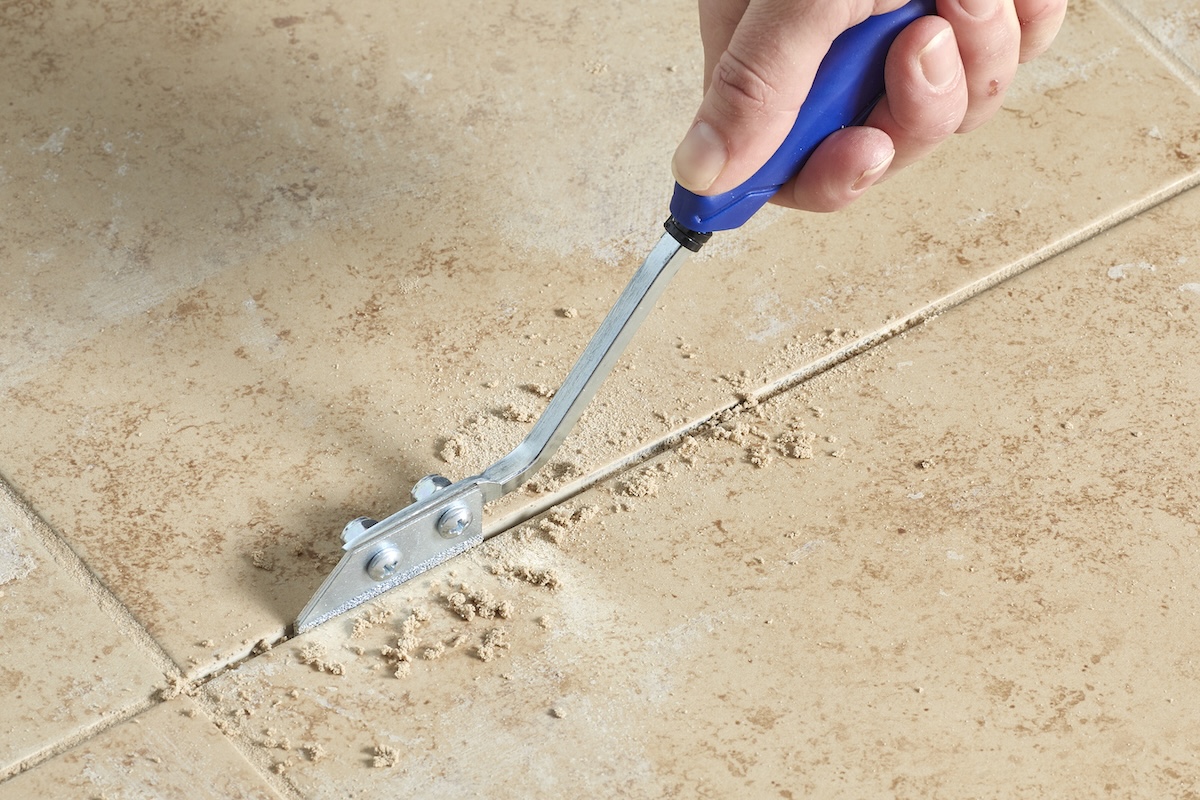
Photo: Tom Fenenga for Bob Vila
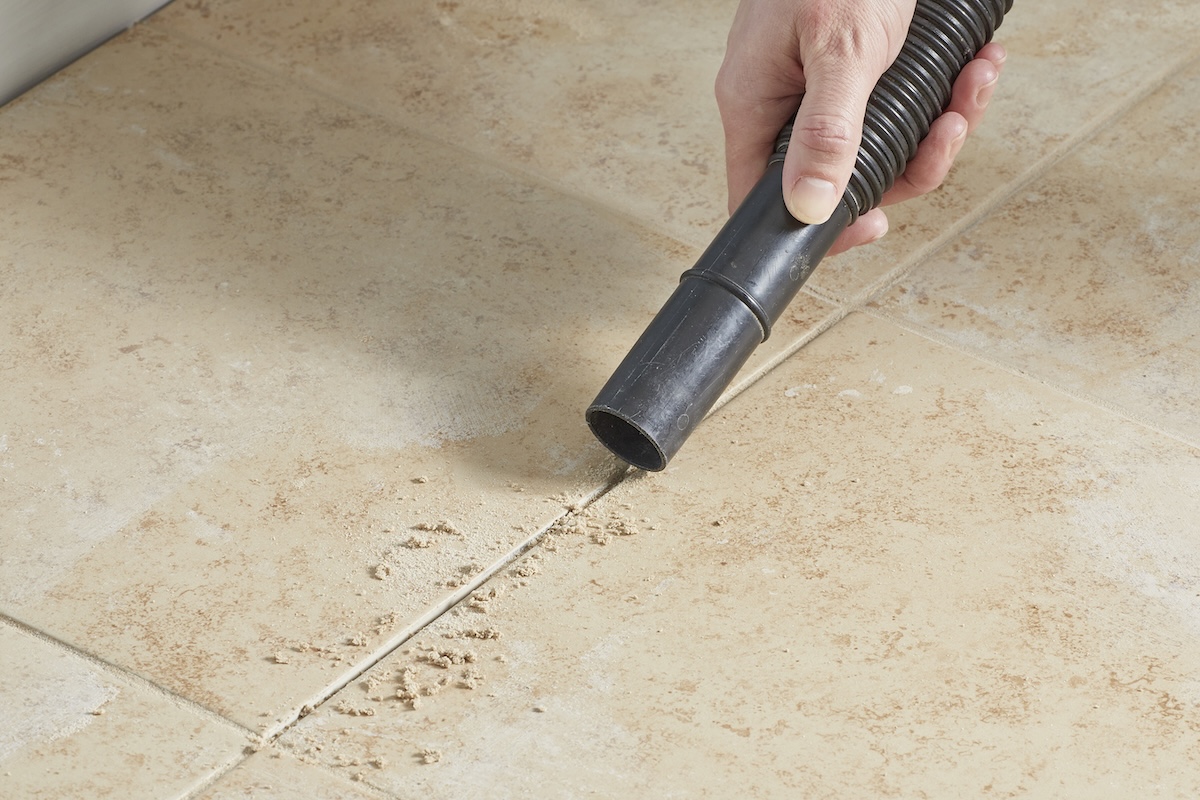
Photo: Tom Fenenga for Bob Vila
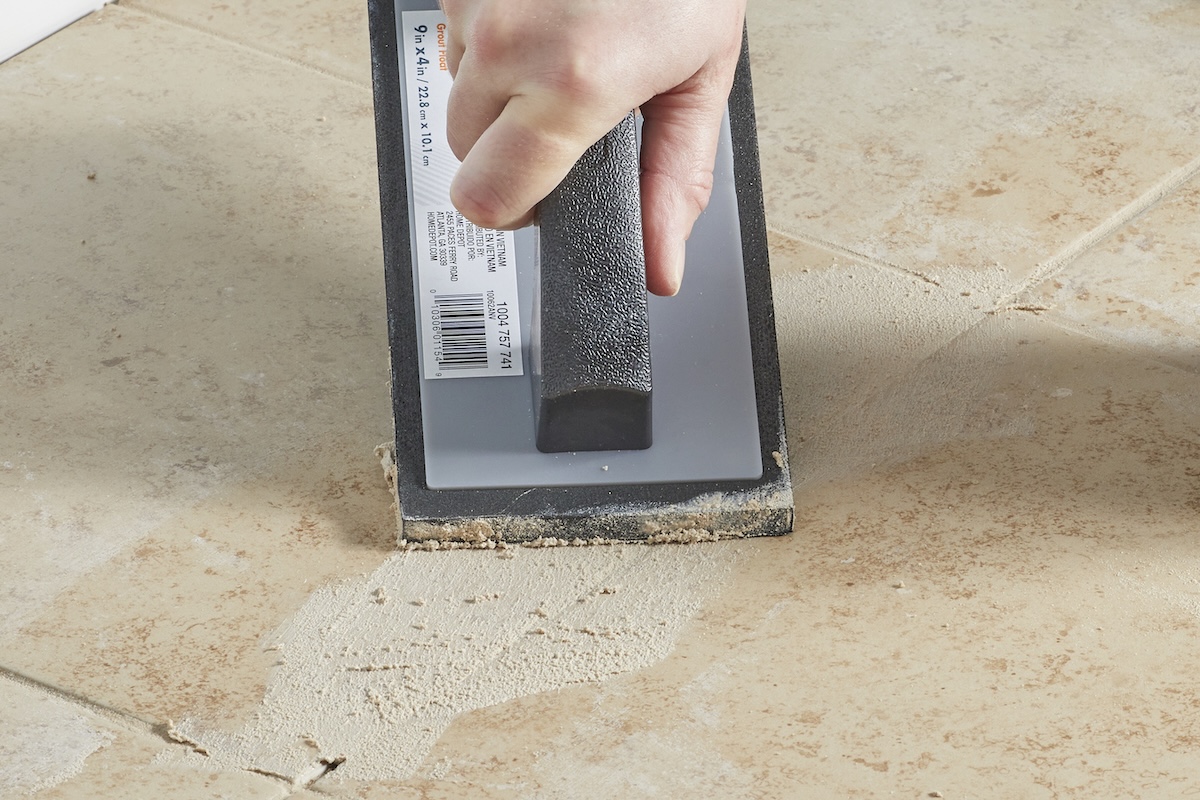
Photo: Tom Fenenga for Bob Vila

Photo: Tom Fenenga for Bob Vila

