We may earn gross from the Cartesian product usable on this page and enter in affiliate program . Learn More ›
You may think that your bathroom is sparkle clean : The faucets gleam , the way smells new , and you ’ve diligently scrub the brown rust stains off the rim of your toilet bowl . But your Book of Job may not yet be done . You may have ignore the one spot that ’s most often overlooked : the toilet storage tank . Unless you ’re trying to diagnose or ready a running stool , you unremarkably have no intellect to look inside the armored combat vehicle . But beneath that lid lurk unsightly stains , mineral deposit , and maybe even bacteria . Over fourth dimension , grunge and buildup in the tank can eat the flushing mechanisms and lead to overweening staining of the lavatory bowl . As well , collected deposit can affect the performance of the flush andfill valves .
By cleaning your commode tankful just twice a year you could keep your bathroom reek fresh , hold out the life of the flushing mechanism , and maybe even keep your toilet bowl a fiddling cleaner . So what are you wait for ? pink out this one job quickly and make your toilet truly spotless by following this guide on how to strip a toilette tank .

Photo: Tom Fenenga for Bob Vila
Tools & Materials
Bobvila.com may pull in a commission from purchases made through these links .
Project Overview
Working Time : 20 minutesTotal Time : 1.5 to 13 time of day , look on pluck timeSkill Level : BeginnerEstimated Cost : $ 4
Cleaning a Toilet Tank in 7 Steps
It almost goes without say , but we commend donning rubber baseball glove before beginning this task . It ’s also helpful to place a boneheaded towel on the storey , so you have a protective layer between the toilet tank lid and your bathroom tile .
Step 1: Assess the condition of your tank.
hit the lid from the tank and place it cautiously on a nearby surface . Flush the tank and find out that the weewee is coming into the tank from the fill valve , that the flapper or cartridge seals firmly , that there is n’t too much slack in the chain that link up the lever to the flapper , and that the toilet does n’t continue to run after the flapper or pickup close . If anything is n’t operating correctly , project onmaking some repairsafter you ’ve cleaned the tank ( see Step 5 ) .
After checking the flushing action , expect at the experimental condition of the inside of the tankful . If you remark just a bit of surface grease and stain , move on to Step 2 . If , however , the inside of the tank is colour from mineral deposition and you see a lot of residue at the bottom of the tank , jump to Step 3 .
Step 2: Clean the tank.
If the storage tank is n’t very dirty and does n’t have much deposit at the bottom , here ’s how to scavenge the toilet tank without run out it . Put on caoutchouc gloves and either scour the sides and bottom of the tank with a long - handled brush and a minuscule dish grievous bodily harm , or pour in about 4 to 6 cups of bloodless acetum and let it sit down for about an hour . ( acetum is a great note of defense against stamp and mold , hard water deposit , and more . ) After the tank has soaked , scrub down the inside of the tank with a long - handled brush . ( Be certain to wear down glove . ) Use a smaller skirmish or an old toothbrush to clean any gook or discoloration from the filling or flush valve . When you ’re done , flush a few sentence to pull in out the acetum and marked-up water . Continue flushing until the water system in the toilet bowl is decipherable .
If this method did n’t quite get your toilet storage tank uninfected , go to Step 3 .
Step 3: Empty the tank.
If your tank is heavily unclean , you ’ll have to debilitate the water before cleaning it . site the shut - off valve , which is usually behind the can , toward the base . Turn it all the means clockwise to curve off the water provision . Flush the bathroom repeatedly — two or three flushes should do it — until it drains all . There may be about a half column inch of water leave in the tank , and that ’s fine . If there ’s a draw of sediment at the bottom of the tank , you could wipe it out with a leech or tatter . Have a bucket nearby to squeeze out and rinse the sponger until the sediment has been clear out . Alternatively , you’re able to apply a soaked / teetotal vac to hoover out the deposit .
Step 4: Soak and scrub the tank.
Fill the tank up to the overflow tube ( the tube connected to the flush valve ) with equal parts piss and snowy vinegar . Depending on the size of your tank , this could take as many as 3 gallons of acetum . countenance the solution model without flushing for a few hours or overnight . When you ’re ready to start scrubbing , flush the vinegar out . Again , this may take two or three flushes .
When the tank is empty , put on rubber gloves and set out scrub the inside of the armored combat vehicle . For especially refractory stains , satiate a spray bottle with a half - and - half solution of acetum and water and spray down the side as you scratch .
Step 5: Make any necessary repairs or adjustments.
If you have repairs to make , it ’s a good estimate to do them now , while the piss is off and the armored combat vehicle is still empty . Even if the flapper is still working , if it ’s adhere , or if it seems either very stiff or very indulgent , you might need to get atoilet repair kitand replace it and other major gutter portion ( it make sensation to do them all at once ) . These are all sign of an maturate flapper — most flappers last just 3 and 5 years . If you have no mending to make , move on to Step 6 .
Step 6: Wipe down the flapper.
Using just water and a sponge or rag , pass over down the can flapper . If there ’s accumulated sediment and slime remaining on any of the constituent , including the flapper and the fill valve , scrub them with a small brushing or a soup-strainer or wipe them off with a sponger .
Step 7: Refill the tank.
Turn the handle on the shut - off valve counterclockwise all the fashion to refill the tank . Flush the toilet a twain of time , find out the activity of the wealthy mechanics to ensure the flapper is closing firmly and the toilet is refilling efficiently . If not , make adjustments ( shorten or lengthen the chain or flex the adjustment piece of tail on the filling valve ) .
How to Keep a Toilet Tank Clean
Now that your toilet armoured combat vehicle is clean , take steps to keep it that room . By minimizing rusting stains and mineral deposits in the storage tank , you may be able to extend the life of the affluent and filling valve , and the toilet bowl will persist cleaner too . Try these strategies for preserve the tank neat between cleanup .
Final Thoughts
While you do n’t need to clean the toilet tank frequently , giving it a quick inspection and scouring once or twice a year can keep the toilet working well , cut down on odour , and minimize staining . It ’s important not to practice harsh chemicals , and especially not blanching agent , when you clean the lav tank . Many manufacturing business will annul warranties if you practice in - tank dry cleaner , so keep your cleansing efforts simple , set yourself to dependable , old - fashioned elbow grease , dilute vinegar , and maybe a small dish soap . The caper is n’t peculiarly hard or time - consuming , and when you do it , you ’ll have the atonement of knowing that your lav is sporty , at bottom and out .
FAQs
stool manufacturer are inquisitively silent on the field of how to strip your toilet storage tank , although they offer plenty of advice ( and products ) for make clean the lavatory bowl and outside . They do , however , specifically monish the use of can tankful cleaners . Despite the deficiency of manufacturing business guidance , there are practical intellect for cleaning the armoured combat vehicle . Over fourth dimension , sediment , grime , and mineral buildup can affect the carrying out of the flush valve and lead to bowl maculation ; mineral deposits can constipate the rim holes in the roll ; and odors can prepare . Then there are cosmetic concerns : Sometimes it ’s just gross under that lid ! All of this indicate for cleaning the tank occasionally but using gentle cleaning products that can still get the problem done — in other words , vinegar and dish soap , along with some scouring .
acetum is in force against82 per centum of mold species , and it work particularly well on the hard , nonporous surface of a toilet .
This Is the yr for a Kitchen Renovation
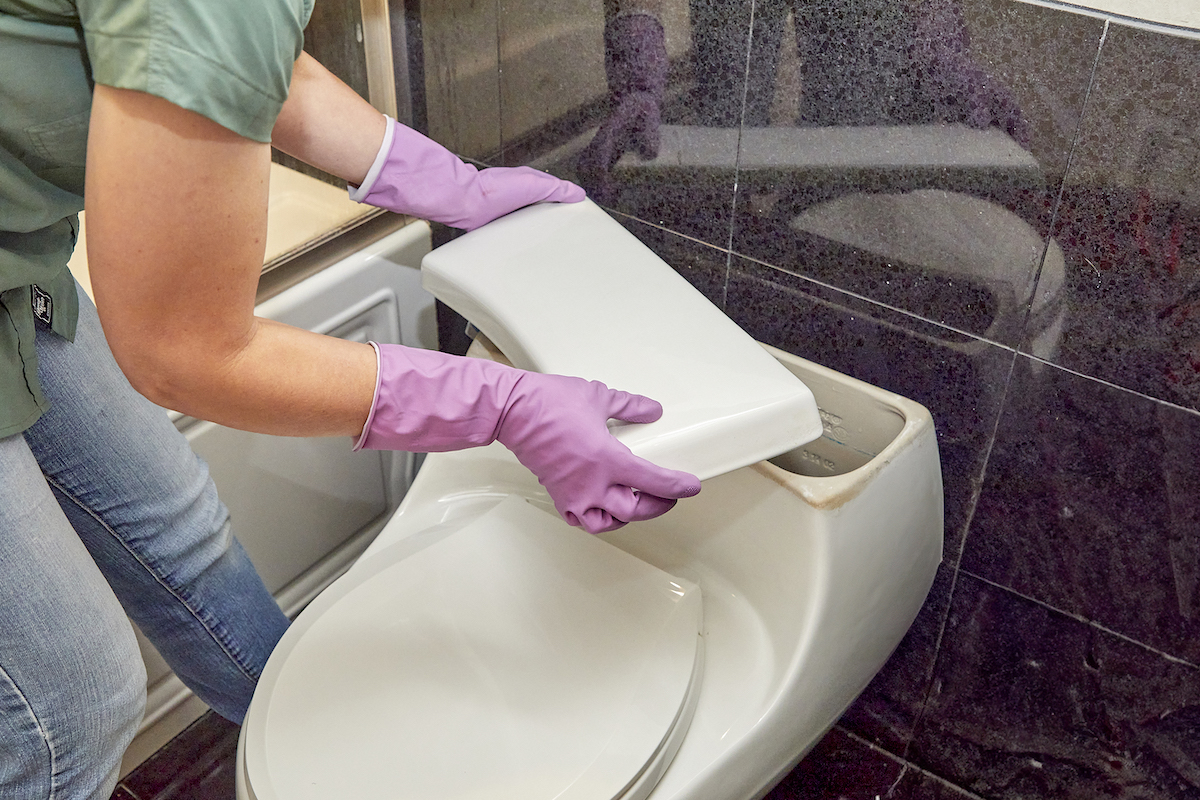
Photo: Tom Fenenga for Bob VIla
Whether you ’re sell or staying , everyone can get something out of a kitchen update . check why we consider this renovation the Most Valuable Project of 2025 and how to outride on budget .

Photo: Tom Fenenga for Bob VIla
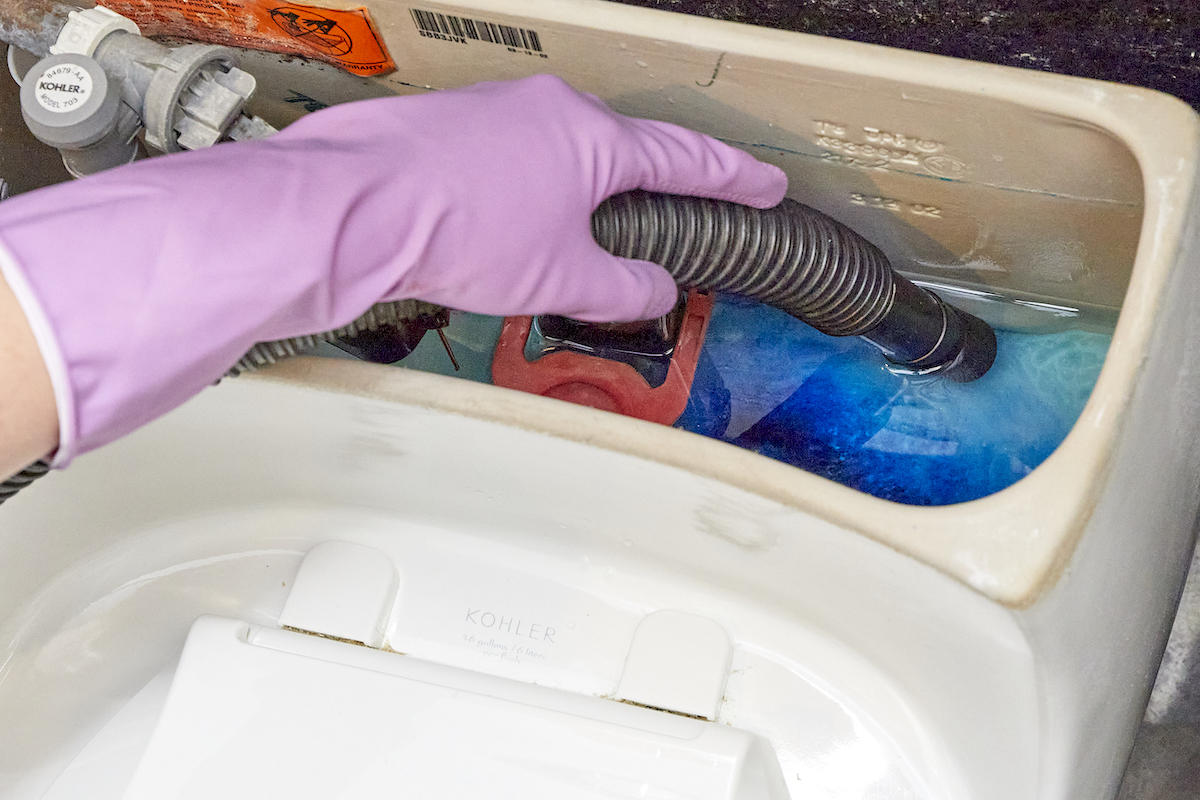
Photo: Tom Fenenga for Bob Vila
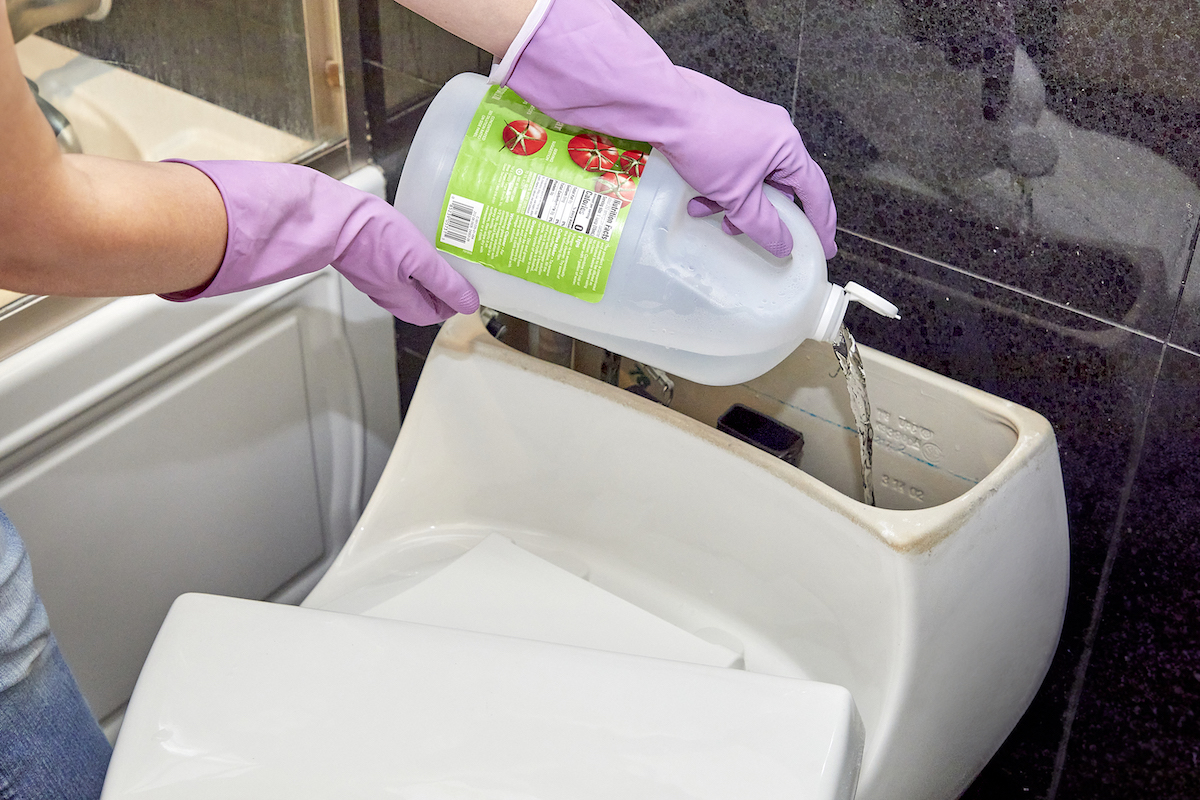
Photo: Tom Fenenga for Bob Vila

