We may earn revenue from the ware available on this page and take part in affiliate programs . hear More ›
A faucet , whether it ’s in the kitchen , lav , or behind the ginmill , acts like a miniature decameter , holding back a pressurise stream of water system until you lift or twist the handle .
According to the National Association of Home Builders , it ’s good to gestate the average spigot to last about 15 years . Even before then , yours may set out to leak , either from the nozzle or at the base of the fixture , so it ’s important to have sex how to mend a leaky spigot .
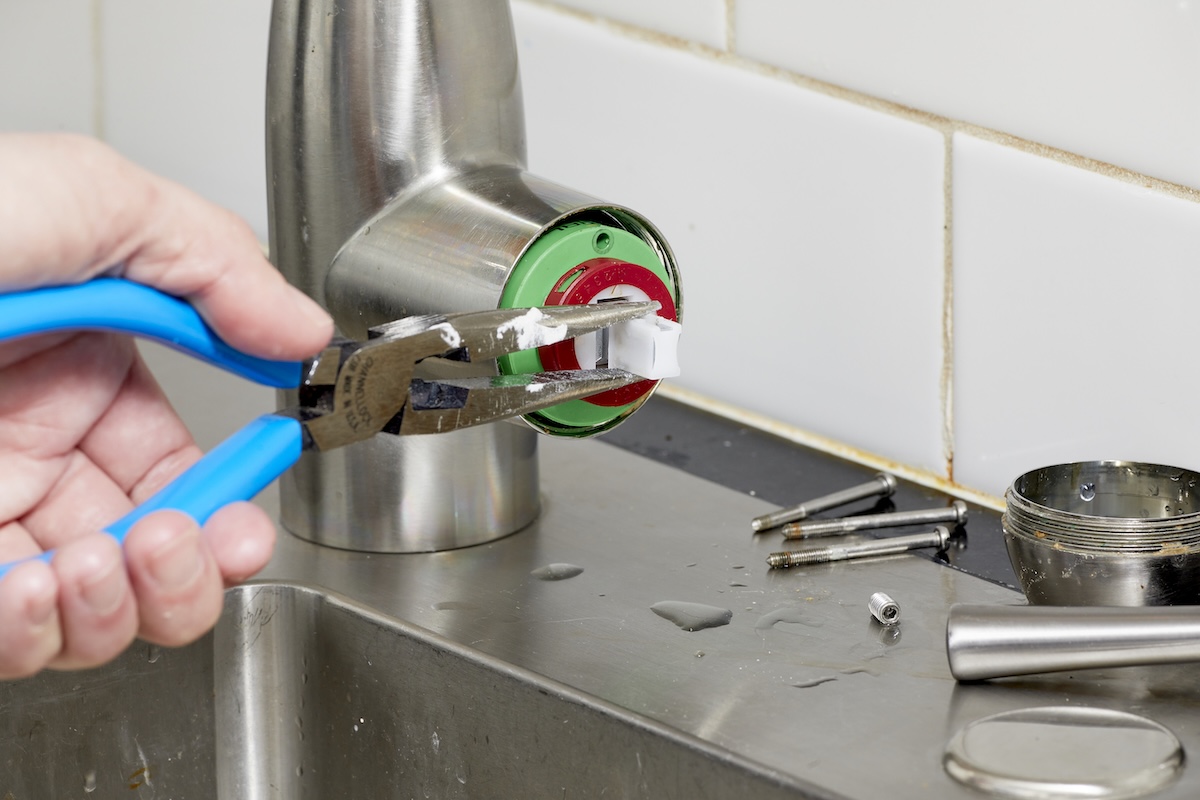
Photo: Tom Fenenga for Bob Vila
As before long as you notice that a faucet is dripping , seek to make the mend forthwith . Stopping the dripping as before long as you’re able to save money and resource . After all , theleaky faucet calculatorprovided by the U.S. Geological Survey reminds us that one dripping every minute wastes 34 gallon per class .
Before You Begin
The first step to repairing a leaky spigot involves preparing the faucet and sink . Start by turning off the water to the sinkhole . Usually , the valves are below the sink washbowl , tight to the wall . There should be one for hot and one for cold . work both clockwise .
Next , undecided thefaucetto release any water leave behind in the credit line , and then end the drain . If you do n’t have a skillful drainage cover , simply place a towel over the drain to keep lowly constituent from falling in .
Repairing a talebearing kitchen orbathroom faucetis a relatively straightforward plumbery project , but there are different ways to fix different kinds of faucets . Before you set out the repair , you ’ll take to learn what case of faucet you have .
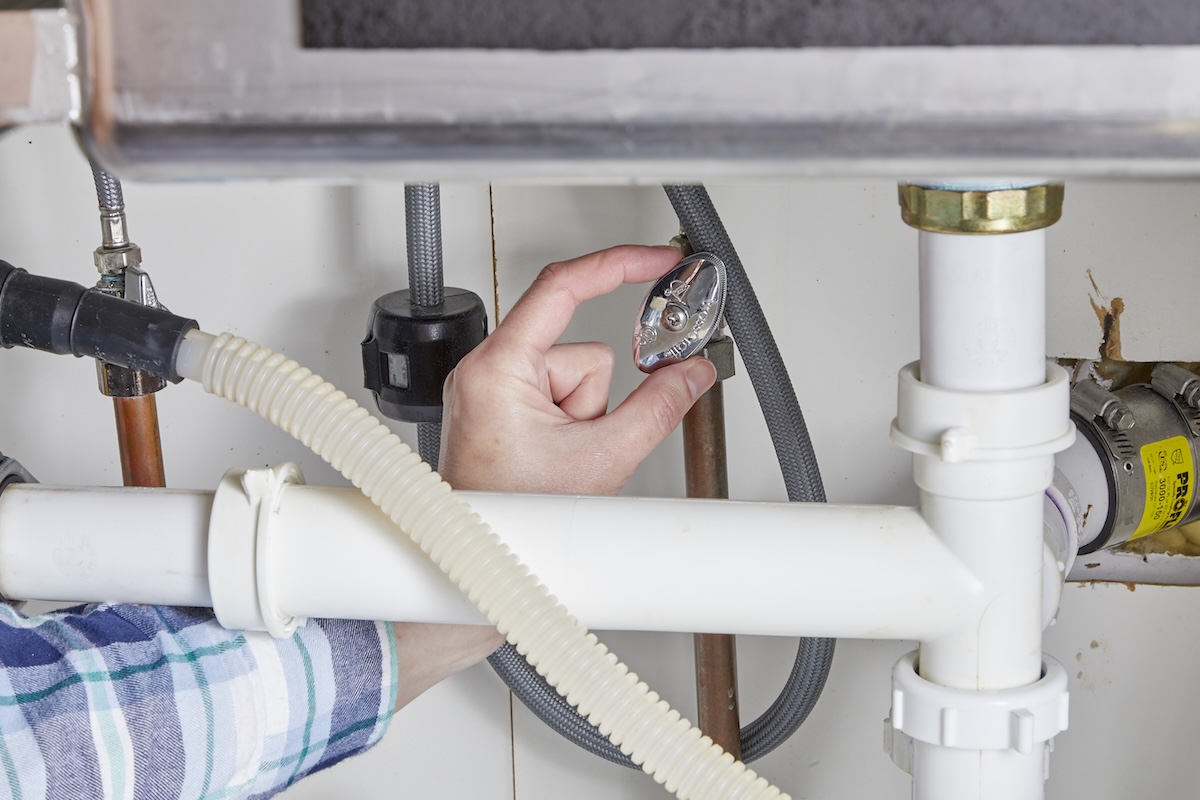
Photo: Tom Fenenga for Bob Vila
There are two canonical category of spigot : those with washers and those without . Faucets with washers are known ascompression faucets . spigot without washer are known aswasherless faucet , and they let in cartridge , ceramic - disk , and ball - type faucets . line up the section below that describes how to touch on your case of faucet .
How to Fix a Leaky Compression Faucet
A densification faucet hold back water in the plumbing system with a little condom automatic washer that tighten up in the valve derriere . It ’s similar to how a bottle cap piece of ass onto the top of a plastic soda water container .
SUPPLIES
Step 1: Remove the cap from each handle.
In club to cook a talebearing faucet , you will need to gain admission to the intragroup portion of the faucet , so the first stair is to absent the decorative cap from the top of each handle .
verify the drainage is close , then look for a pocket-size circle on the top of the handle that may have an “ hydrogen ” for spicy or a “ C ” for frigid . apply a flathead screwdriver to softly arise up the cosmetic cap , exposing the screwhead underneath .
As you continue , it ’s a good idea to lay the portion out in order you removed them so that they are already organized in the correct ordination when you need to reinstall them .
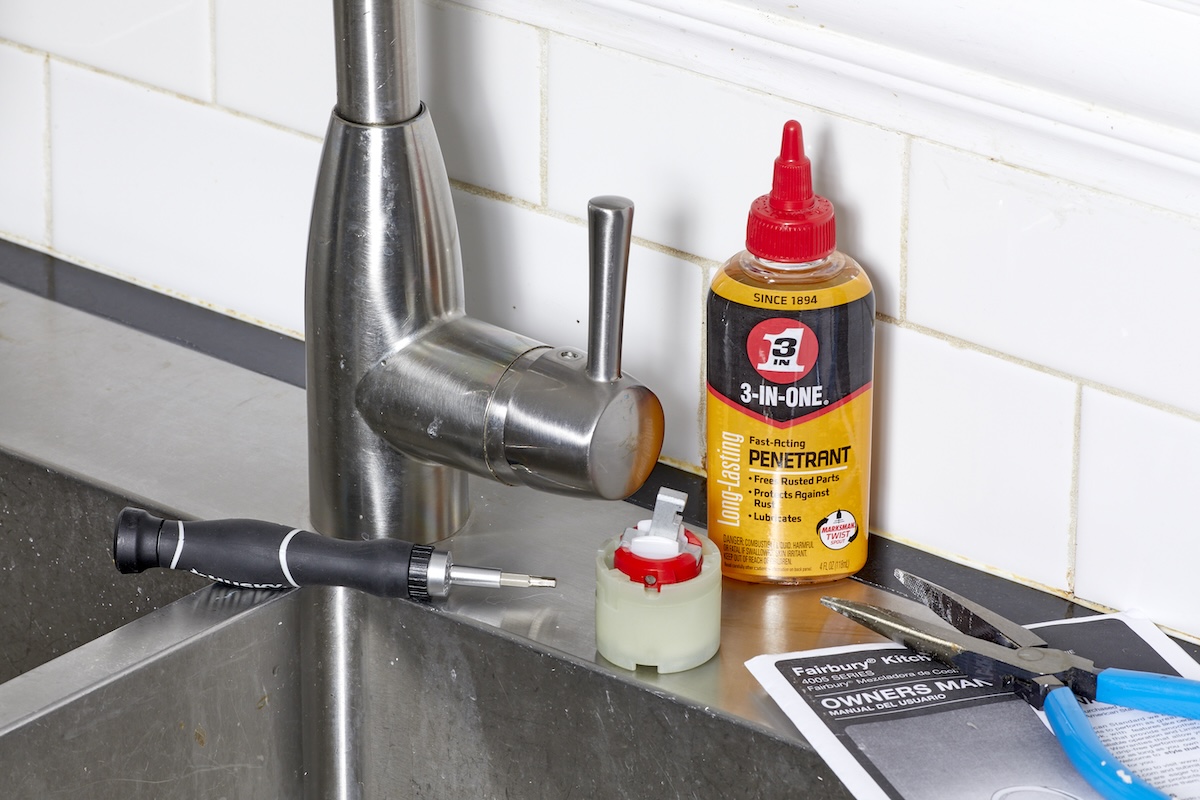
Photo: Tom Fenenga for Bob Vila
Step 2: Unscrew and remove the handles.
contain the case of screw that is currently securing the handle and utilise a compatiblescrewdriverto loosen the screws . These fuck are commonly standard flathead screws , but sometimes the faucet handle is good with a curse set screw , so you will necessitate to have ahex wrenchor hex screwdriver ready if this is the suit .
With these screws removed , the handles should raise off well . However , if the screw or the handles seem to be seized , try using permeate oil to help oneself loosen the trying on .
Step 3: Take off the stem nut.
With the handles removed , you should see the stem and the root word nut , which hold the stem in place . Use a wrench to cautiously loosen and transfer the stem turn nut .
Keep in mind that plumbing system theatrical role can be damaged by a wrench with to a fault aggressive teeth , so consider using a toothless twist to avoid doing damage to the theatrical role of the faucet .
Step 4: Pull out the stem and inspect the O-ring.
The stem should now be free so that you may merely extract it out , divulge the oxygen - tintinnabulation and tail end automatic washer . The O - ring is creditworthy for prevent leak from the actual grip of the faucet .
If it come out haggard or if you have had issues with the handles leak , then you may need to supervene upon the atomic number 8 - ring while the faucet is disassembled . These parts are relatively inexpensive , so you do n’t involve to interest about dipping into your home emergency fund .
Step 5: Remove and replace the seat washer.
The washer at the bottom of the root is called a arse automatic washer . This is the part of the spigot that gets press by the handles to exit the flowing of water system through the faucet . It is the part that is typically responsible for a leaking faucet . Check to see if the automatic washer is being held in place by a screw propeller before attempting to off it . If it has a screw , then murder it first before taking out the backside washer .
Once the seat automatic washer has been taken out of the spigot , interchange it with a Modern seat washer . If you are n’t sure about the exact group O - ring or tush washer replacement , then take the sometime , worn part to a local hardware memory . It ’s significant that you get a utter substitution so as to stave off next problems after gathering .
Step 6: Reassemble the faucet.
The new seat washer should now be in place and the rest of the part should be close at hand in the order that they were removed , so all that ’s left is to carefully reassemble the spigot . The order of reassembly for each hold should be seat washer , atomic number 8 - anchor ring , stem , stalk nut , handle , hold screw , and decorative cap .
Step 7: Test the faucet.
Never close a project without test the finished study , especially when it comes to plumbing . The slightest wrongdoing or misalignment can stimulate a big problem , so now that the spigot is reassembled , go ahead and get to the frigid and hot water valve located under the sinkhole . The water should apace fall through the spigot , expelling a small amount of melodic line .
When all of the air has been pushed out of the system , deform off the faucet and check the handle and the tap for leak . A making water indicates that a part of the faucet was not piece correctly or that a part is jade out and needs to be replaced .
How to Fix a Leaky Washerless Faucet
Unlike a compression spigot that has a washer to control the flow of water , a washerless spigot relies on a disk , orb , or cartridge for the job . Less prone to leaks , this character of faucet usually has one handle rather than treble knob .
To fix all type of washerless faucets , you ’ll need the following :
If you ’re repairing a cartridge spigot , you ’ll also need :

Photo: Tom Fenenga for Bob Vila
If you ’re animate a ballock faucet , you ’ll also need :
If you ’re repairing a ceramic - disk spigot , you ’ll also postulate :
Step 1: Remove the cap from the handle.
Just as you do when fixing a compaction faucet , start by removing any decorative caps that are cover the grip get laid . Look for a circular plastic or metal cap that may have a hot or dusty blueprint to denote the centering to rick the handle for red-hot or cold body of water .
Use a flathead screwdriver to gently pilfer up the cosmetic cap and disclose the gaoler underneath . identify the region in orderliness as they are removed , so they are already organized when it comes time to reassemble the spigot .
Step 2: Unscrew and remove the handle.
swear that you have the correct screwdriver to loosen and remove the handgrip jazz , then proceed to unscrew the handle . After taking off this fuck , the grip should lift off easy , but if there are any issues with the screw becoming seized , use penetrating crude to break up rust or sediment in the thread .
Step 3: Disassemble and remove the internal components according to the faucet type.
Depending on whether the faucet is a cartridge , ball , or ceramic - disk type , the parts that are exposed after remove the handle will be more or less dissimilar .
Step 4: Inspect the parts for wear and damage.
The next stride in this operation depend on whether the character of faucet is a cartridge , ball , or ceramic - disk .
Step 5: Replace any worn or damaged parts.
Cartridge , chunk , or ceramic - disk spigot will require dissimilar contribution to fix the leak .
The new contribution should now be in plaza and the relief of the faucet gathering should be in the edict that they were removed , so all that ’s forget is to carefully reassemble the faucet . The Holy Order of reassembly for each faucet will depend on whether it is a pickup , ball , or ceramic - record spigot .
Always check that to try thefaucetafter a hangout . Go ahead and turn the faucet to the open position , then call on on the cold and hot water valves located under the sinkhole . The urine should quickly course through the spigot , eject a small amount of zephyr .

Photo: Tom Fenenga for Bob VIla
When all of the air has been pushed out of the organisation , work off the spigot and check the handle and the tap for leak . A leak indicates that a part of the faucet was not assembled right or that a part is wear out and necessitate to be replaced .
Final Thoughts
Leaky faucet are irritating , costly , and can lead to clay sculpture outgrowth and health problem , so it ’s of import to repair or exchange a dripping spigot as soon as potential . Making the repair is typically as well-heeled as make apart and reassemble a puzzle , as long as you know what you ’re doing . verify to lie out the parts in the order in which they were removed , so that they can be returned to their original position without an issue .
Also , keep in mind that while most talebearing spigot problem can be fixed by interchange safety or neoprene seal , automatic washer , and O - rings , sometimes the issue is n’t as simple . Do n’t pause to call a plumber if you are n’t able to restore the leaky bathroom orkitchen fauceton your own , or if you need someone toinstall a new faucetfor you .
FAQs
Aleaky shower head , bathtub faucet , or sink faucet is typically because of faulty or worn component inside the assembly , include O - mob , washers , and gaskets . Making a quick hole by supplant these part is unremarkably easier and more low-priced , instead ofreplacing kitchen faucetsentirely .
Having a dripping spigot in the home wo n’t generally make the sink to overflow unless the drain is plugged , but the incessant moisture in the air and inside the swallow hole can cause mould to grow . Mold growth is dangerous , especially to unseasoned children who can in reality develop asthma from prolonged photo to mold .
you’re able to attempt to tighten the handles or find a ‘ sweet-smelling spot ’ that may stop the dripping , but this is in no way a foolproof or permanent method . It ’s better to utilise a little slice of hosiery that can fit over the spout of the spigot . Secure the hose to the faucet with a hosepipe clinch , then conclude the other end of the hose with an additional hosepipe clamp . This will trap the dripping urine in the small piece of hosiery until you are ready to fix the leaky faucet .
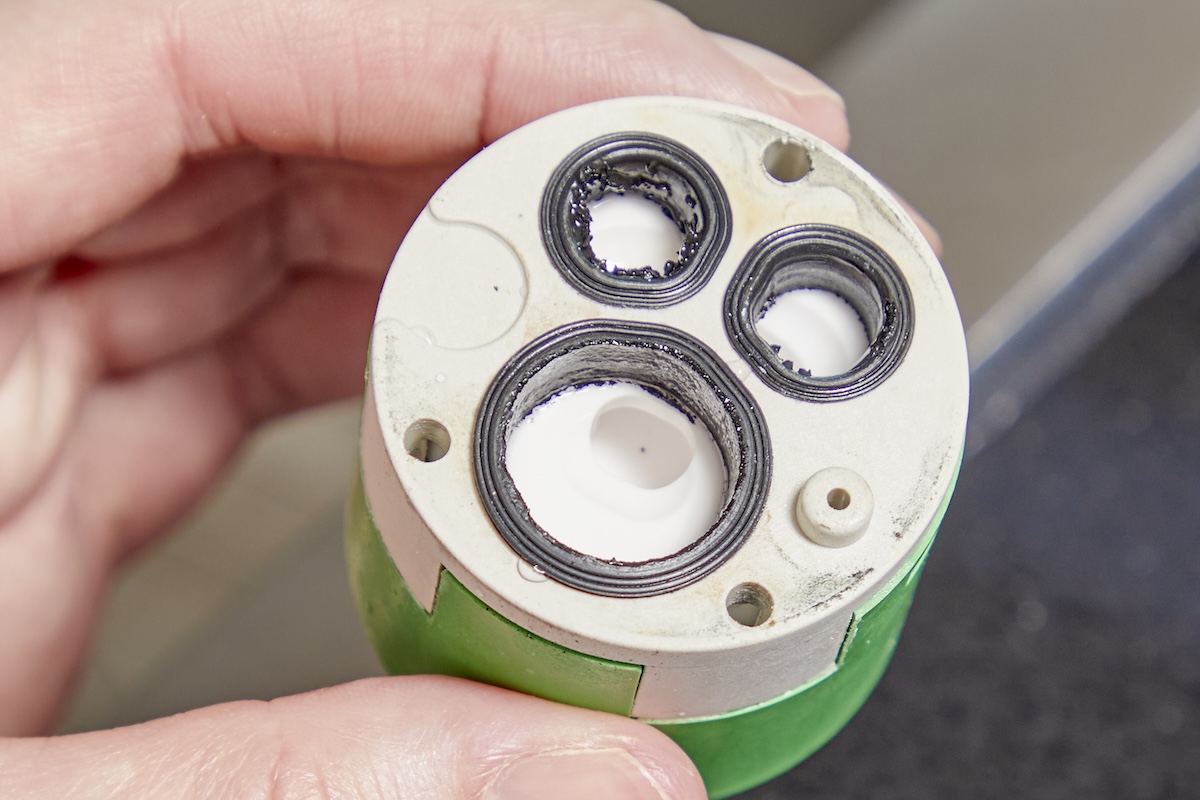
Photo: Tom Fenenga for Bob Vila
No , the water supply needs to be off . Either turn the water off to the integral home or just to the faucet you are fix . Otherwise , you will be attempting to do work with minor parts that are easy to lose while piss is spray up and out of the faucet into the lav . This uncontrollable spray causes implosion therapy and water legal injury , not to mention the likeliness of mold growth in the be days . So , no , do not attempt to fix a talebearing faucet without turning off the urine unless you arereplacing outside faucetsand you do n’t mind the full - pressure spray that will slow pluck the ground .
This Is the twelvemonth for a Kitchen Renovation
Whether you ’re selling or staying , everyone can get something out of a kitchen update . Learn why we consider this renovation the Most Valuable Project of 2025 and how to stay on budget .
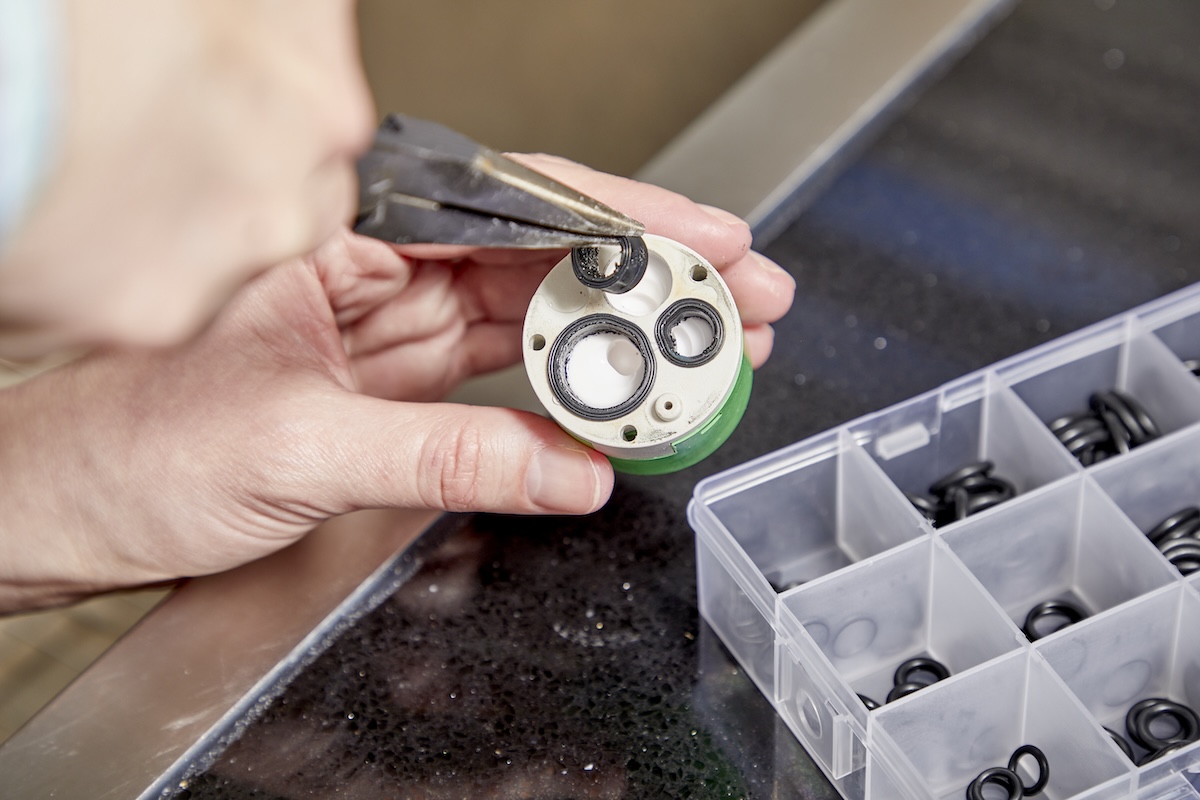
Photo: Tom Fenenga for Bob Vila

Photo: Tom Fenenga for Bob Vila

