We may earn receipts from the product usable on this page and participate in affiliate program . find out More ›
Ever since we ’ve had doors , we ’ve been reinventing ways to be alerted to a visitant ’s arriver . Hefty smoothing iron disparager gave way to chink bells that chime at the turn of the handle , and today , technical advanceshave made doorbells more versatile than ever . Whether you ’re updating your entry and want toreplace an sometime doorbellwith a more inviting model or you ’re looking to upgrade to something “ smart , ” we ’ll guide you on how to take as well as how to install a doorbell that ’s proper for your home .
Before we jump in good order into the how to install doorbell pedagogy , keep in mind that there are three main types of doorbell option available today : firmly - wired , wireless , and net - capable ( which link to your home ’s router , in either wired or wireless version ) . You ’ll find specific instructions walking you through how to install a bell for each of these types of ringers below .

Photo: istockphoto.com
How to Install a Wired Doorbell
Installing a doorbell deals with low - voltage electrical energy , and is a relatively straight DIY if you take the necessary precautions , include shutting power off before you get startle .
A banner , hard - wired doorbell has three factor — the clitoris , the chime , and the transformer — which can be purchased together in doorbell outfit or separately . telegraph doorbells run anywhere from $ 25 to more than $ 500 for decorative bell units and smart technology feature .
SUPPLIES
STEP 1:Determine if your home is wired for a doorbell.
Hardwireddoorbellsare generally installed during the building of a home when an lineman can easily melt wires through the bare walls . If the home is n’t electrify for a buzzer , the easiest course of action is to purchase a wireless doorbell .
If your home was never cable for a doorbell and you ’d prefer a pumped model , induction can be costly because new wires must be fished through the wall , and that ’s a labor - intensive procedure . The process involves finding a nearby junction box , wiring in a new transformer , and running new wires to the side of the room access — more work than is really necessary to get a doorbell .
To retard whether your household is wire for a doorbell , dilute off the home plate ’s force at the mainbreaker box . Then , remove the bell and see if there are wires behind it .
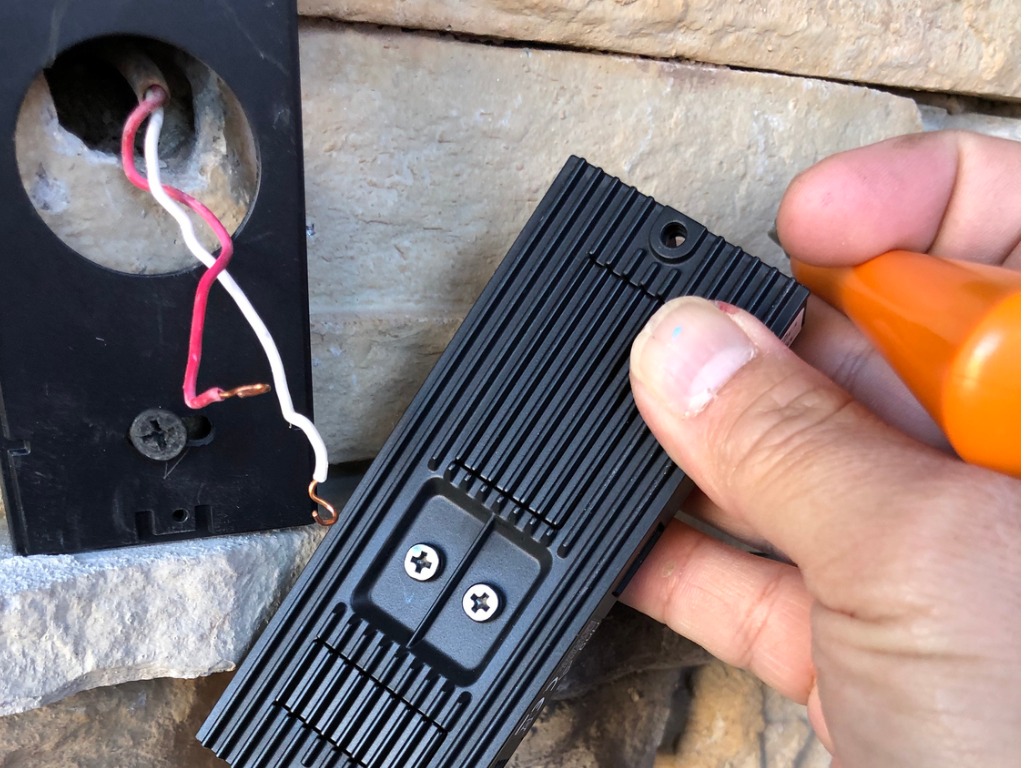
Photo: istockphoto.com
STEP 2: Check if the doorbell transformer is working.
Transformers are small box connected to an electrical box seat with a set of small , thin wires associate to them . These gadget take 110V or 120V electricity and transform ( or reduce ) it to the 8V , 16V , or 24V degree that a buzzer will require . You ’ll usually find transformer in nearby closets , basement , usefulness rooms , and other out - of - the - room spaces .
To determine if the transformer is run , use a multimeterto trial it . With themultimeterset to VAC ( volts AC ) , point the probes on the two jailer that are confine wires in place . If there is n’t a interpretation ( 8V , 16V , or 24V ) , the transformer is no good . The just news program is that installing a doorbell transformer is n’t all that hard or severe , as long as the breaker is off .
STEP 3: Cut off the power to the bell at the breaker box.
A wired doorbell is linked to the home’selectrical arrangement , so you ’ll require to shut off the power to the bell at the breakers box before installing a new one . The doorbell ’s transformer thin a domicile ’s standard 120V to less than 24V so as to accommodate the humbled - voltage wires that join to both the clit unit and the bell box .
STEP 4: Remove the existing doorbell’s components.
Use the screwdriver to remove the doorbell button from the wall and unplug the wires from the doorbell button . Do n’t prune them , as there is often very little wire to work with . move out the cover from the doorbell chime ( they typically just lose it on , but some may have screws ) , and disconnect the wires from the chime . Remove the mounting prison guard holding the bell to the paries .
If the transformer needs replacing , you ’ll need to withdraw it . pop out by carefully taking off the covering fire plate on the electrical box that the transformer sits on . Use anon - contact testerto ensure that the power inside the box seat is indeed off , despite what the transformer may enjoin you . Once you are certain that the index is off , withdraw the wire nuts and conducting wire plug into the transformer to the electrical circuit .
STEP 5: Replace the doorbell transformer (optional).
If the doorbell transformer demand supercede , now is the fourth dimension . First , transfer the existing doorbell transformer from the electric cover plate and reprocess the entranceway and safety nut to mount the Modern transformer in place . With the breaker still off , wire the new transformer into the electric system by distort the wire together and capping them off with wire nuts . Finally , bond the wires coming from the bell and button to the transformer before mounting the covering fire plate back on the junction box seat .
Note : determine the chime ’s package to determine which potential drop it requires—8V , 16V , or 24V — and then watch the transformer ’s wiring diagram toconnect the wirescorrectly . This is merely a matter of using the right two of the three screws , so do n’t feel restrain . Also , it ’s a good theme to switch the surf back on briefly and examine the new transformer before moving fore to ensure that it work and that the voltage is correct . apply the multimeter to verify the voltage .
STEP 6: Attach the wires to the new doorbell button and chime.
Mount the newfangled bell on the paries and confiscate the wire coming from the transformer as well as the wire that runs from the transformer to the clitoris . If there are multiple doorbells , be trusted to position the wire on the terminal labeled “ front ” or “ back , ” as appropriate . Otherwise , simply connect the transformer conducting wire to the transformer terminal , and the button wire to the other terminal .
Mount the new doorbell clitoris on the wall . relate the conducting wire coming from the transformer and the wire coming from the bell to the doorbell push . The arrangement of these two wires does not weigh as long as you attach one to each terminal .
STEP 7: Switch the breaker back on and test the doorbell.
Turn the surf box back on . Next , quiz the doorbell to insure that the chime works and is hearable .
If the doorbell does n’t exercise , it is either wired incorrectly or it is n’t getting the amount of electromotive force it needs . If the buzzer is chime constantly , even when the button is not depressed , there is either an topic with the wiring or the button is damaged . Check to verify that there ’s only one telegram go to each terminal . Your doorbell should be ready to use now .
How to Install a Wireless Doorbell
If the family does n’t have existing doorbell wiring , going radiocommunication is often the best pick . A wireless doorbell is also a good choice for homeowners who care the estimate of a portable chime box they can put in any way . Inexpensive wireless unit start at about $ 15 ( a basic room access button and male plug - in chime box ) and can be more than $ 500 for wise units . This initiation is super simple , though removing an old doorbell can take some expertise .
STEP 1:Remove the old doorbell button and transformer (optional).
close off the electricity at the breaker box . Then , remove the two mount screws that throw the old doorbell button in place . There are two low - potential drop wires connected to the back of the doorbell release . You wo n’t want to use them for a wireless doorbell installment , so you’re able to either envelop the bare conclusion of the old doorbell wiring with electric tape and tuck the wire back into the paries , or twist credit card telegram nuts over each of the wire .
Removing the old doorbell transformer is n’t necessary , but if you ’d wish to do so here ’s how to keep : Keep the breaker in the off placement . cautiously launch the junction corner that the transformer is mount to and disconnect the transformer wires from the electrical circuit . crest the conducting wire in the box with wire nuts and replace the cover denture .
STEP 2: Determine how far the signal reaches.
Wireless doorbell bell units typically plug into stock indoor outlet . Somewireless doorbellscome with multiple chime boxes that installers can point in different rooms . When shop for a doorbell , check the packaging to determine its maximal wireless signaling space . In most cases , even in very gravid homes , the doorbell bell ’s distance should be more than sufficient .
For menage with farseeing driveways , gate , and other far - away locations where you might need to instal a buzzer , however , the length the signal contact matter more . Chime length typically ranges from 700 to 1,200 feet , so you ’ll want to see to it this figure of speech before buy a wireless doorbell for a gravid property to see to it the doorbell will work decently .
STEP 2: Attach the doorbell plate to the front door casing.
Wireless doorbells do n’t bind to the wall , like wired buzzer do . Most wireless models come with climb up plate , so the buzzer ’s battery can be removed and recharged easily . The buzzer ’s bestride home is typically installed on the same side of the threshold as the hold .
If the doorbell occur with a template , use the templet to pock the shtup locating on the shell . If not , oblige the mount plate in place and score the screw locations on thedoor casingwith a pencil . With a recitation fitted with a little scrap , bore small pilot holes for the shtup . Secure the doorbell plate to the wall with the screws included in the kit .
Be sure that there are freshbatteriesin the doorbell , and snap it into place .
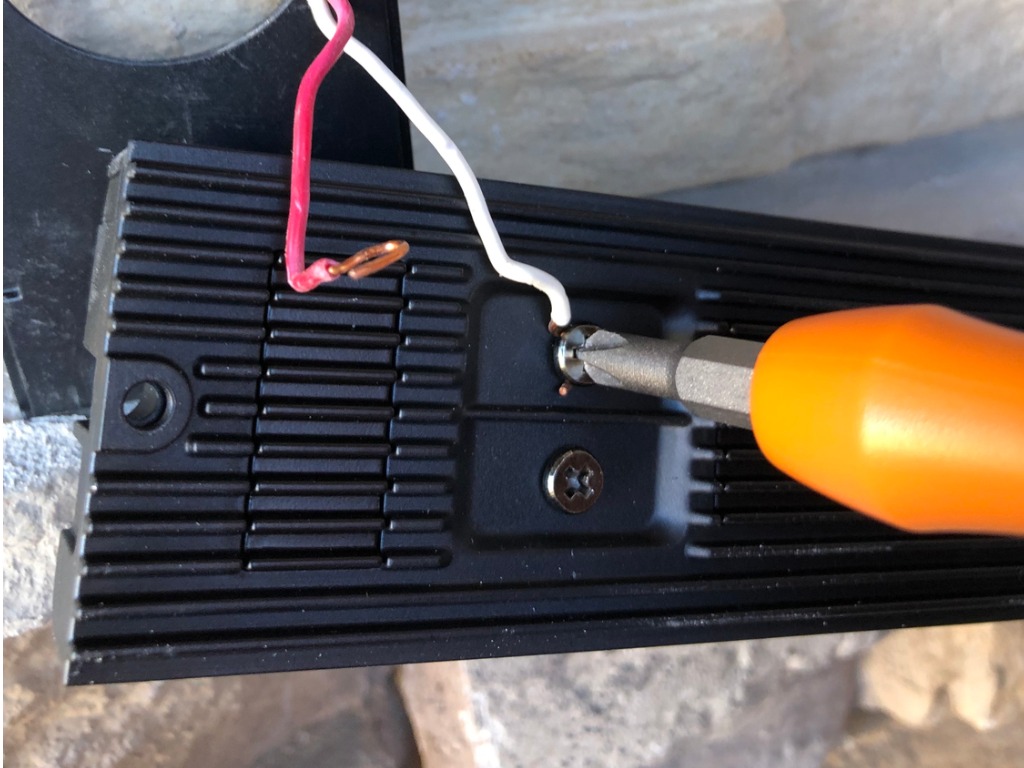
Photo: istockphoto.com
STEP 3: Plug in the chime box receiver and test the system.
Once the doorbell push button is set up , all that ’s leave is to stop up the chime box into an electric outlet and screen the organization . It often makes the most sense to set up the chime box in a key area within the home , such as a hallway , sept room , or kitchen . Plug it into an outlet in each of these locations and have someone exhort the doorbell push to quiz how audible it is in each room . Keep the gong box in a room where it ’s most well hearable .
How to Install a Smart Doorbell
A WiFi - capable doorbell connects to a household ’s wireless router and allows users to supervise visitorsfrom their smartphoneor microcomputer . Options includecameraswith or without night vision , intercom capability , and motion sensing element that ship an alert to a user ’s smartphone when someone approaches the doorway . Smart doorbellsstart around $ 150 and can be more than $ 1,000 count on the extra selected .
STEP 1: Install the mounting plate and connect wires.
Smart doorbells can be install using a wired method ( which keeps their batteries charge ) or a wireless method acting ( which requires charging batteries more often , but offers maximum tractability with facility ) . Both induction are relatively easy — that is , the pumped doorbell induction is easyifthere are wires already in place .
To install a smart buzzer ’s mounting plate , accommodate the mounting home plate over the wires , mark the screw holes on the casing or wall , and then remove the plate . ( You are installing a wireless smart doorbell , of class , you are not restricted by wire and can direct the mounting collection plate wherever you care . ) utilise a drill with a minuscule drill bit to drillpilot holesfor the screws . Mount the plate to the paries using the screwing that came with the bell . For pumped-up installations , connect the wires to the terminals according to the manufacturer ’s pedagogy .
STEP 2: Sync the smart doorbell to your Wi-Fi and the manufacturer’s app.
Sync the button unit to the home ’s Wi - Fi router and to a smartphone . This process will vary by manufacturer , and will likely want download and set up an app on your telephone set that will let you to control and supervise the buzzer ’s features remotely . Get this one done and you ’ll be capable to monitor your doorbell from anywhere .
Final Thoughts
Learning how to instal a doorbell of any sort is n’t all that hard . While there are nuances between wire , wireless , and smart doorbells , the installation cognitive process is rather straightforward . The template above helps take the air the norm DIYer through all the type of doorbell and their instalment proficiency , and as long as they ’re followed measure - by - tone , they should have no problemfixingor find out how to wire a doorbell . The most significant thing to remember is to twist off the surf before attempt any electric work .
FAQs
We ’ve covered a lot of data on instal a buzzer , but DIYers may still have some lingering query . The following are answer to some of the most frequently asked question about how to replace a doorbell .
Q. How does a doorbell work?
A buzzer is essentially just an electric circuit or iteration . The doorbell button breaks the loop topology . When the doorbell clit is dismay , the circuit is completed and an electrical charge is sent to the bell , activating the gong .
Q. How much does an electrician charge to install a doorbell?
Estimates diverge based on region and the range of body of work , but homeowners can look to yield $ 100 to $ 450 for a doorbell installation .
Q. Are doorbells typically connected to circuit breakers?
wire doorbells are always on a circumference breaker , but not directly . They ’re bind to a transformer , and that transformer is connected to an electrical circuit that the breakers panel controls .
Q. Where is my doorbell transformer?
There are a few station to look for a doorbell transformer . First , check any closets near the front threshold . Also , check in the basement near the breaker panel or near the front door . Other home to expect include utility rooms and near hardwired warning machine systems .
Q. Do all wired doorbells need a transformer?
Yes . Wired buzzer are designed to habituate less potential drop than typical theatre electric current . This provide them to use thin wire and exempts them from certain building codes .
This Is the Year for a Kitchen Renovation
Whether you ’re selling or staying , everyone can get something out of a kitchen update . memorise why we see this renovation the Most Valuable Project of 2025 and how to last out on budget .

Photo: ring.com
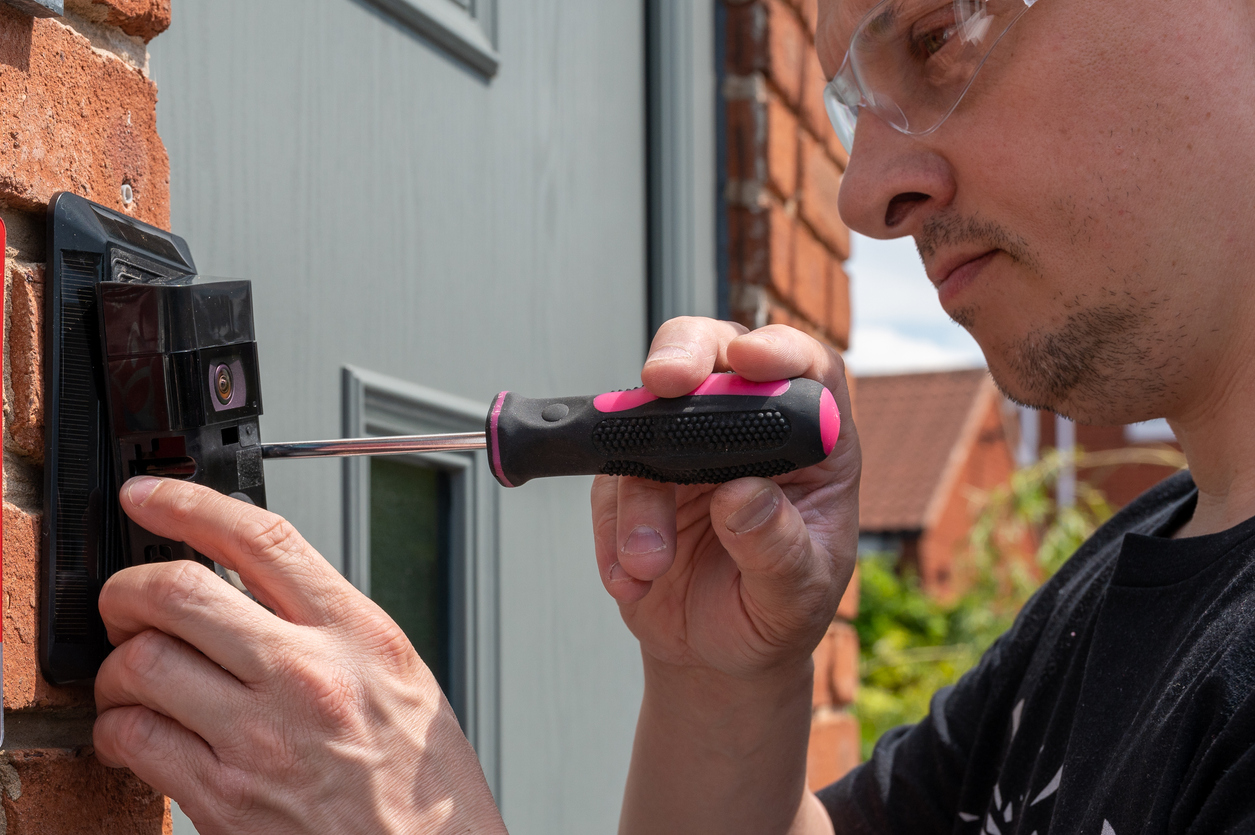
Photo: istockphoto.com

Photo: istockphoto.com

