We may earn revenue from the products available on this page and take part in affiliate programs . Learn More ›
Our 20 - year - sure-enough console were show their historic period . The lacquer finish had gummed up around the handgrip and pulling , and the locker track and drawer fronts were endure and dinged . In summation , my wife and I were tired of the gloomy soil and the dated , discolored ironware . The storage locker were well built , though , with solid wood doors , draftsman fronts , and frames . It would have been a shame to bust them out , and replacing them with a similar score console would have cost thousands of dollar .
Havingpainted cabinetsin previous home , I have it away the pit link with applying enamel paint . stick the look of a factory finish is not prosperous for the average homeowner . Nevertheless , a do - it - yourselfer can achieve a near - gross finish by follow these tips .

Remove the hardware. Remove the hardware. Photo: JProvey
How to Paint Kitchen Cabinets
STEP 1: Time it right
Choose a week when temperature are temperate . Avoid red-hot conditions because it will have the key to dry before it can whole raze itself , leaving ridges triggered by brush bristles .
STEP 2: Clear the area
Empty your cabinets and drawers , as well as the countertop and ledge . Take advantage of the opportunity to get free of duplicate and stuff you never use . Put everything in moving box seat and store them in a nearby room .
STEP 3: Remove doors, drawers, and hardware
Do not chaff yourself into believing you’re able to accomplish a professional result without doing this . verify that you keep cartroad of which cabinet doors and drawers go where , as it will make the re - install considerably easy . itch diminished papistical numerals under flexible joint leaves on cabinet build and doors is one mode .
STEP 4: Cordon off the kitchen
If the labor look like it will require a lot of sanding , hang up overlap sheets of charge plate over the kitchen ingress to keep sanding dust from migrating throughout the household .
STEP 5: Clean cabinets thoroughly
wash out the locker frames , doors , and drawers thoroughly with aTSPand water supply answer . give special attention to cabinet near the range . You ’ll be amazed to find how grunge has accumulated in the various corner of console threshold .
STEP 6: Sand all surfaces
Lightly sandpaper all surface that will be painted with 220 - moxie paper . This include both side of the doors , the drawer front , rails and stile . pliant sponge sanding pads , like those from 3 M ( vista on Amazon ) , exploit cracking in the recess of raised panels .
STEP 7: Apply primer
If your cabinets are stained , go for at least two coats of lineament fuze . For me , there ’s nothing good than BIN , Zinsser ’s shellac - based pigmented primer . It dry out fast and flat , without thicket marks ( unlike most fossil oil - based primers ) . you may buy it at home and ironware stores , as well as online ( position on Amazon ) .
STEP 8: Prepare cabinets for paint
gently sandpaper the initial primer coat , wipe it with a tack textile , and educate for applying the last coat . You ’ll need a mountain of dust - free outer space for this . A two - railcar garage is ideal . Several pairs of sawhorses ( or erstwhile chair ) and a big drop fabric are helpful , too .
STEP 9: Thin your alkyd-based paint
Mix a thinning agent into an alkyd - based enamel paint concord to the manufacturer ’s steering . For this job , we used Benjamin Moore ’s Impervo semi - gloss paint . annul using water - base paint unless you ’re okay with seeable brush strokes . For the thin , I ’ve have had excellent results with Penetrol ( scene on Amazon ) .
STEP 10: Apply the paint finish
Paint the back of the cabinet door first . Do the fronts last ; they ’ll be less likely to be marred by dripping . Apply paint with the cereal ( in the direction of the longest property ) .
Allow the coat to dry thoroughly before flipping over the room access ( or draftsman ) and doing the opposite sides . Be vigilant about drips and key buildup in recesses .
( Note : For doors with recessed dialog box , paint the recesses first using a 2 - in . brushing designed for alkyd enamels — a China - bristle coppice , or a coppice with a blending of polyester and nylon . )

Lightly sand primed surface. Photo: JProvey
Paint the flat areas , including the locker box , with a mellow - density foam roller or with a high - quality bristle brushwood .
Tip off hustle and sweep surface by lightly tangle a wet ( but not load up ) encounter tip across the entire length of the surface you ’re painting .
STEP 12: Last but not least
Reinstall doors and drawers , hinges and catch . Then put in the new drawer and doorway pull or knobs .
Money - saving gratuity : There are many source online for cabinet computer hardware at abstruse discounts compared to family center . The choice is greater , too .
This Is the yr for a Kitchen Renovation
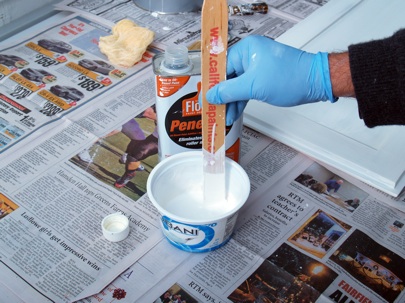
Mix paint with thinning agent. Photo: JProvey
Whether you ’re sell or staying , everyone can get something out of a kitchen update . Learn why we consider this refurbishment the Most Valuable Project of 2025 and how to quell on budget .

Painting the cabinets. Photo: JProvey

Re-install hardware. Photo: JProvey

