We may earn tax income from the products available on this pageboy and participate in affiliate programs . get a line More ›
From the fifties through the ’ 80s , the ceiling in many novel base were finished with a rough , stippled grain that became known as a “ popcorn ” goal . exponent touted the sound - dampening holding of popcorn ceilings , and professional constructor liked using them because they hide airfoil imperfectness substantially than their smooth counterparts . today , popcorn ceilings escort your outer space 50 eld — and not in a smart , mid - century advanced way of life — like nothing else . Another downside of popcorn ceiling ( aside from being just plain vile , that is ) is that they do n’t reflect much lighting , and cast a dreariness to a room even when the curtain are open .
If you ’d care to get disembarrass of a popcorn ceiling andbring your home into the 21st hundred , you have a twosome of pick : One , you canremove the Zea mays everta textureand refinish the ceiling . This is not a difficult chore , though it is a working class - intensive and extraordinarily mussy one . Two , you’re able to treat the eyesore overhead with planks , tile , or other materials . Ahead , learn how to remove Zea mays everta ceiling and give your space a brand - new look .
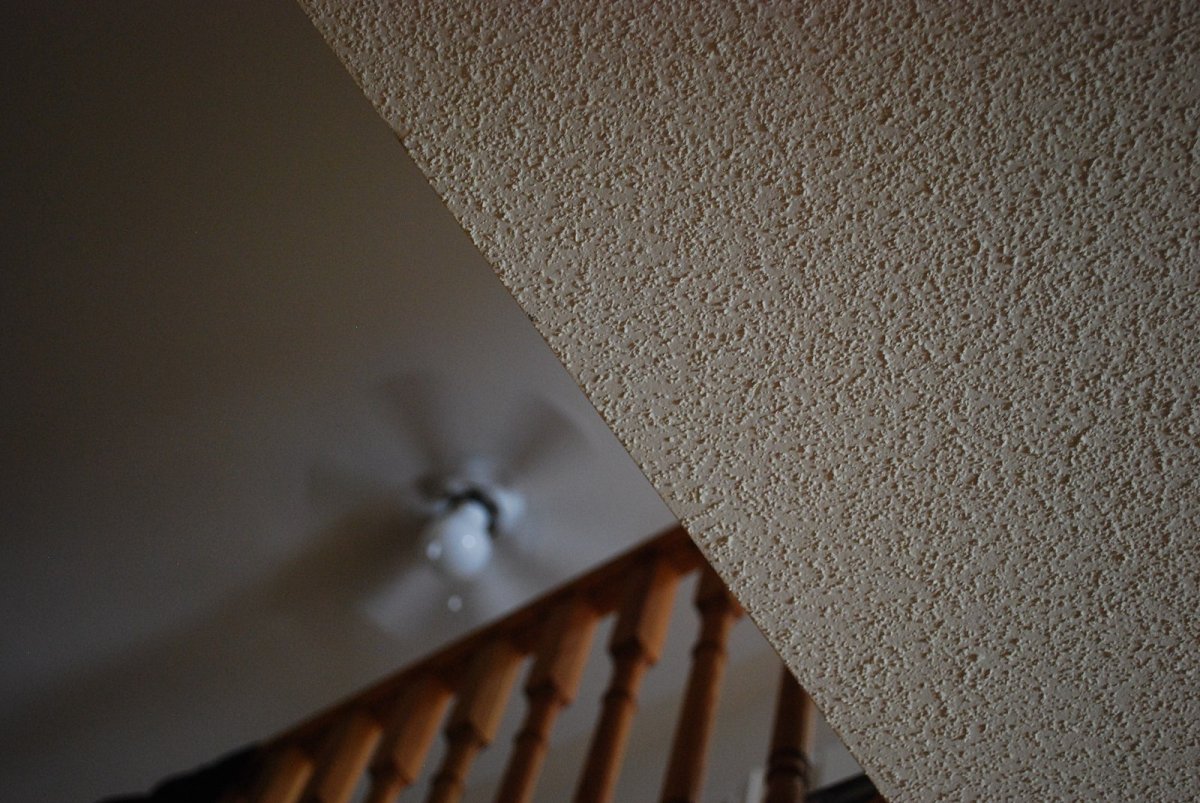
Photo: Photo: Enoch Leung from Canada,CC BY-SA 2.0, via Wikimedia Commons
Before You Begin
Before you start put drop curtain textile and dreaming about fluid ceilings , your first order of business is to screen the cap for asbestos . Why ? Asbestos is a known carcinogen that was widely used in home building until the EPA get down banning its use in the mid-1970s . If you have a textured roof and your home predates 1978 , the year in which theEPA banned spray - on surfacing fabric that control asbestos(including the sprays that gave popcorn roof their bumpy textures ) , there ’s a fair fortune that there ’s a carcinogen lurk overhead . Sending a sample distribution of your ceiling to the EPA - certified laboratory list on your asbestos test is the only sure mode to eff where you stand .
How to Test for Asbestos in a Popcorn Ceiling
Though the compendium procedure will alter depending on the asbestos test outfit you use , the general method forhow to quiz for asbestosis as follows :
If an at - home run bring out that your Zea mays everta ceiling does carry the carcinogen , you have two choices : Leave the ceiling be — asbestos is relatively harmless if it is left undisturbed — or call in aprofessional asbestos abatementcompany . The health cost to scrape popcorn ceiling containing asbestos far outweigh the money you ’d save by doing this project yourself .
If the mental test indicates that your roof has a newspaper - based Zea mays everta treatment , you may handle the rough-textured ceiling remotion yourself . Because the cognitive operation involve pee , you ’ll first want to cut electrical ability to the room where you ’ll be work . Don your dust masque and safety goggles , and you ’re ready to set out .

Photo:Amazon.com
SUPPLIES
Dust maskSafety gogglesMasking tapeor heavy - duty Felis concolor ’s tapePlastic sheetingPutty knifeLadderGarden sprayerMetal filePaint
STEP 1: Prepare the room.
Removing a Zea mays everta roof makes a liberal mess . decent train the room beforehand , however , can minimise the amount of killing you ’ll have when the project is all over :
Upper walls have to be protected from the mess , too . Here ’s the appendage to follow :
STEP 2: Moisten, then scrape, the ceiling in sections.
Divide the roof into 4 - foot by 4 - ft sections . With a garden nebulizer , soundly moisten the initial section , letting the water soak in for 10 or 15 minute . pose the run under the moistened discussion section , Holding aputty knifeat a 30 - degree angle to the roof , startscrapingthe popcorn away . The method is to spray , await , and then scrape . In this manner , work your way around the room , one incision at a prison term .
STEP 3: Prime and paint the ceiling (optional but recommended).
stay on until you have removed the popcorn cap to reveal thedrywallunderneath . ease up that you ’ve put so much work into preparing the room , covering the walls and floor with plastic sheeting , now ’s the clip to prime andpaint the ceilingif you be after on doing it . expect until the final coat has dry out before take the sheeting .
STEP 4: Reinstall ceiling fixtures and restore power to the room.
If you ’re reinstalling a ceiling fan , enlist an assistant to help oneself you bear its weight while reconnecting it . Turn the power back on to the room .
How to Cover Popcorn Ceiling With Tile
Although scraping is an effective fashion to get disembarrass of a popcorn ceiling , the mint of popcorn removal can be more of a fuss than some DIYers are willing to tackle . Another choice to regard is to use decorative glue - up tile to comprehend up the Zea mays everta ( pictured here areLilies and Swirls Glue - Up PVC tile ) . These roofing tile are generally made from polystyrene , PVC , or tin , and are fairly easy to cut and install .
Decorative cap tilesX - Acto tongue , service program knife , or hand sawConstruction adhesiveLatex caulk
STEP 1: Determine how much tile you need.
aim the identification number of cap tiles needed to cover the roof by multiplying the length time the breadth of the room , and then dividing the entire arena by the sizing of the tile . It ’s a good idea to grade 10 to 15 percent more material than you think you ’ll ask , to account for breaking and waste .
STEP 2: Plan the layout of the tiles.
You need your tiled ceiling to look proportionate , and slivers of roofing tile on one side of the room and full - sized pieces on the other will make your space look out of whack . For a professional - looking job , firstfind the center of the ceiling , and differentiate your starting compass point with chalk lines . Use an 10 - Acto knife or helping hand experience to trim the tiles to the sizes you need .
STEP 3: Glue the tiles to the ceiling.
Apply grammatical construction adhesive around the border of the back of each roofing tile in turn , and then dab a few Lucy in the sky with diamonds of adhesive material in the middle of the tile . One by one , press the tiles onto the cap , ensuring that they ride flush next to each other . reckon on the type you use , it may be helpful to bear the tiles in station at the seams with masking magnetic tape as the adhesive dries .
STEP 4:Caulk the ceiling perimeter.
Fill in any gaps or edges around the perimeter of the room with a latex caulk such asDAP Kwik Seal adhesive caulking .
How to Cover a Popcorn Ceilingwith aPlank Ceiling
If you ’ve updated your floors , piece of furniture , windows , lighting , and everything else and your meretricious , textured ceiling is the only matter standing between you and a chic dwelling house , there ’s yet another way to fast track removing Zea mays everta ceilings from your life : plonk over them . We ’ve heard of householder using materials like plyboard and beadboard , but you could also use tongue - and - groove planking , like thisplanking from Design Innovations , as bloggerSincerely , Mariedid .
Although this project requires some longanimity and the help of a DIY collaborator , the consequence are worth it . ( When shopping for plump , be sure to buy 10 to 15 pct more product than you require to account for waste . ) This is how to get the plunk - roof aspect in your own base .
Stud finderChalk lineCircular saw(optional)Miter saw(optional)Finish nailerWood planksConstruction adhesive2 - in finish nailer nailsSandpaperPrimer(optional)Paint(optional)Stain(optional)Wood conditioner(optional)Paint supplies(optional )

Photo: istockphoto.com
STEP 1: Use a stud finder to identify the ceiling joists.
You ’ll be tie the planks to ceiling joists , so you ’ll necessitate to start out by scar their location using astud finder . stretch out a chalk line along to identify each cap joist . The trash communication channel will serve as a guide when it ’s sentence to attach each add-in to the ceiling using your nail gun .
STEP 2: Determine the direction in which you’ll lay the planks.
You ’ll postulate to put down the planks perpendicular to the chalk assembly line , so that each board can be nailed into a joist . If the ceiling arena you ’re cover is low , you may be able-bodied to lay the planks side by side without stagger them . If the room is gravid , you will require to stagger the plank so the joints do not all end up on the same wall .
As you go , you ’ll involve to cut boards to size to account for the room ’s HVAC vents , lightsome fixtures , and roof fans using either a circular byword or chop adage . When you ’re cutting your display panel , take into report the size of it of the vent cover and fixtures . When cutting around a venthole , make indisputable the hole you create peer the sizing of the outlet cover . If you ’re cutting around an electrical regular , make the hole heavy enough to account for the electric box but not so with child that the fixture does n’t all cut through the hole when you reinstall it .
STEP 3: Apply adhesive to the back of each of the wood planks.
You ’ll be using strong-arm nail to attach the display board to the cap joists ; however , you ’ll also want to add liquid nails to each card just before install them to check that they stay put . run fit each board before add the mucilage to ensure it fits well with the adjacent board .
Apply a single line of glue in an entropy - pattern over the entire length of the board . Since the glue is n’t the elemental thing holding the planks to the roof ( the nails are ) , there ’s no need to go overboard with the gum . Applying too much will cause it to embrace out the sides , make a mess you ’ll have to scavenge up .
STEP 4: Nail the planks into the ceiling joists with a nail gun.
Since you ’ll be adhering the planks to the gravelly ceiling texture , not directly to smooth dry wall , you ’ll demand to use nails to secure the plank in the ceiling and ensure they outride in place . Using the nail accelerator pedal , give two nail at each point a board cross a ceiling joist . Remember , you ’ll be nailing through the popcorn coating and 3/4 - inch compact drywall , so you ’ll need to use 2 - inch finish nail to assure the nail bites into the joist enough to book the board to the roof .
verify to adjust the depth setting on your nail gun so that the head of the nail ends up just beneath the aerofoil of the plank but no deeper . If you do n’t drive the nails in deep enough , you wo n’t be able to hide the head later . If you drive the nail in too inscrutable , they may push through the thin board and fail to secure it in office .
STEP 5 (optional): Paint or stain your wood ceiling.
This dance step is optional , because natural wood looks great on its own . you’re able to also paint the ceiling plunk down after you instal them , but painting them beforehand is ( literally ) less of a painfulness in your neck . If you select to paint or stain the plank , commence by thinly sanding the boards with 150 to 220 gumption emery paper . Next , if you ’re painting the circuit card , first coat them with a character primer . If you want the ceiling to be more noticeable , go with a semi - gloss finish . For a more nuanced tone , go with eggshell .
If you choose to maculate the ceiling , apply wood conditioner first to ensure you get an even finish . For good results , use an vegetable oil - base smear .
Final Thoughts
There ’s more than one means to deal with a popcorn ceiling . If you do n’t bear in mind the sight of popcorn ceiling removal and require the still look of paint drywall when you ’re done , then accompany the above steps for how to remove a popcorn cap . Make certain to test your ceiling for asbestos before embark on this option .
If you ’re after a more decorative ceiling or are concerned about asbestos , you could leave the popcorn ceiling in place and instead cover it with either roof tile or Grant Wood planks . Just keep in mind that the disbursal of the plank or tiles will increase the price of the task .
FAQs
Below , get out more about the concealed danger of asbestos that might be mess about in your popcorn roof and learn which asbestos removal method acting is tacky .
Q: When did they stop using asbestos in popcorn ceilings?
The Environmental Protection Agency banned nebulizer - on building material that comprise asbestos in 1978 . However , company were still allowed to use asbestos through their current supply of the product , which means it was still being used up through the mid eighties . If your home was build up from the 1950s to the 1980s and has a popcorn cap , there ’s a very dear chance that it contains asbestos .
Q: What does asbestos popcorn ceiling look like?
Since asbestos character are practically invisible , it ’s nearly inconceivable to identify an asbestos Zea mays everta ceiling from a non - asbestos one simply by looking at it . The best mode to determine if the popcorn ceiling in your place has asbestos is to take a sample of it and send it off to an EPA - certified science laboratory .
Q: What is the cheapest way to remove popcorn ceilings?
The brassy elbow room to remove a popcorn cap is to take on this project yourself . According toHomeAdvisor , the average cost to remove a popcorn roof is $ 1 to $ 2 a square invertebrate foot if you pay a professional to do it . you could await to pay around $ 1,927 to remove a popcorn ceiling , depend on the size of it of the room .
This Is the twelvemonth for a Kitchen Renovation
Whether you ’re selling or staying , everyone can get something out of a kitchen update . Learn why we conceive this renovation the Most Valuable Project of 2025 and how to stay on budget .

Photo: istockphoto.com
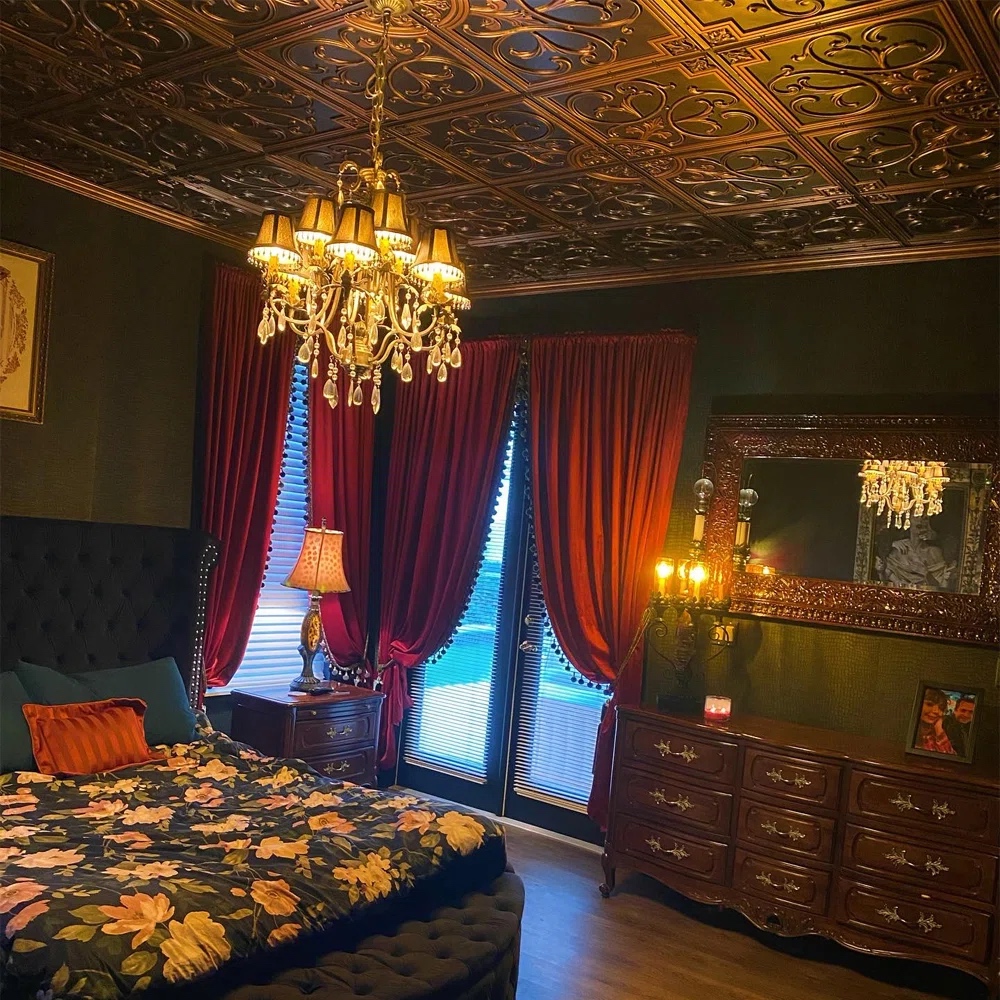
Photo:Wayfair.com

Photo:sincerelymariedesigns.com
Photo: istockphoto.com
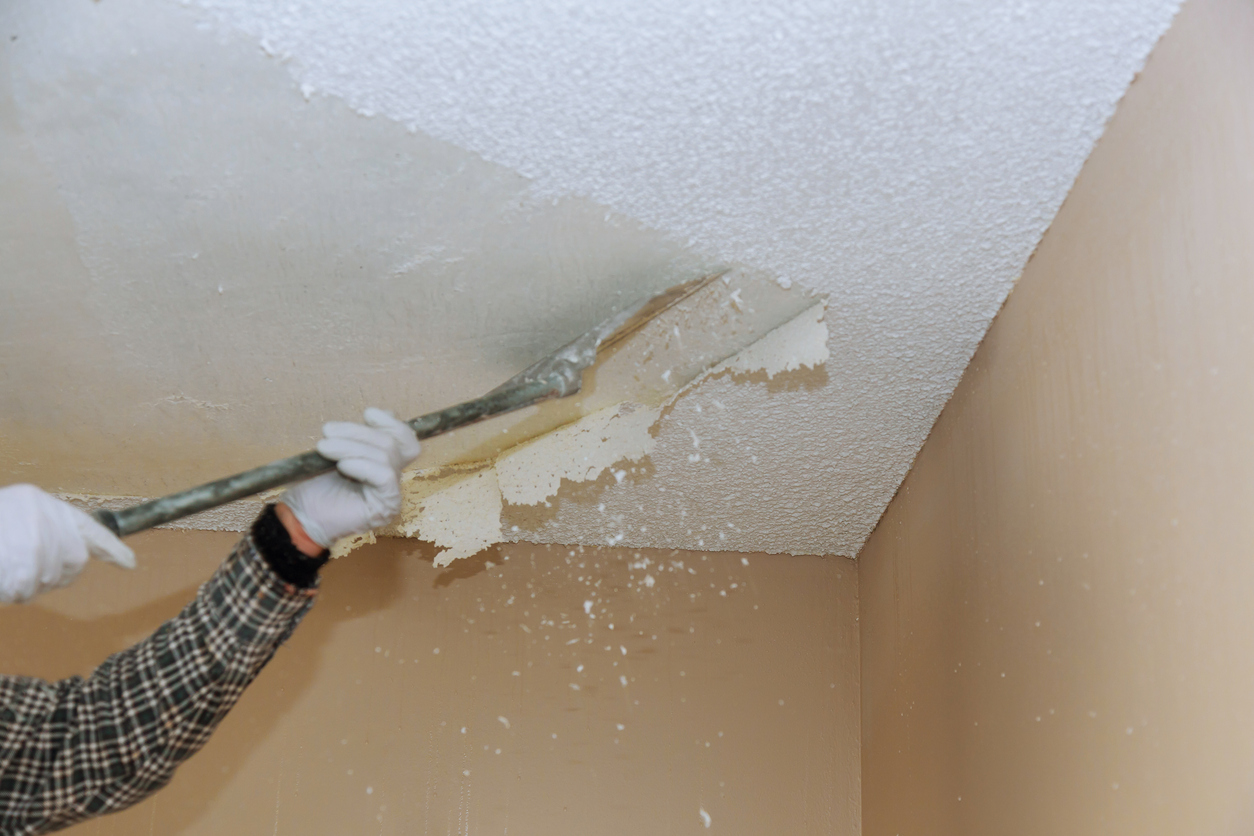
Photo: istockphoto.com

