We may bring in revenue from the products useable on this varlet and take part in affiliate program . Learn More ›
For something you ca n’t even see , a lot is riding on a toilet ’s wax ringing . These unsung bomber create a watertight gap between the bottom of a toilet and the drain piping , preventing water supply and unwanted substances from swash out of the pipe on their mode down , hold everything sanitary and forbid an absolutely gross cleanup task .
While wax ring for toilets can last for decades in the right conditions , they are n’t infallible and may need to be exchange under certain experimental condition . A home plate settling , ethnic music who often model down in a hurry , or poor installation can wear out a wax ring for a toilet untimely . fortuitously , it ’s acommon toilet repair , and learning how to substitute the wax ring on a toilet is n’t too challenging .

Photo: iStock Photo: istockphoto.com
Tools & Materials
Bobvila.com may garner a commission from leverage made through these links .
Project Overview
Working Time : 2 hoursTotal Time : 2 hoursSkill stage : IntermediateEstimated price : Under $ 20 for just the wax ring renewal ; under $ 50 to also repair the flange
Before You Begin
Assess whether or not the toilet ringing seal needs to be replaced . If there is water pooling around the toilet , be sure to stop thewater supply linegoing to the back of the potty as well as the gaskets between the toilet and the tankful . If those areas are dry and secure and water is still collecting around the lav base , it ’s probably clip for a toilet wax ring replacement .
If the toilet is wobbly , the floor flange is belike break up and needs to be replaced , which requires removing the toilet . Anytime someone pulls ( removes ) a john from the flange or is replacing a stool , they have to replace the wax ring in rescript to ensure a stringent long - lasting cachet .
Before you begin dispatch a toilet , it ’s also important to decide what size wax ring is need . Whenreplacing toilets , if the floor rim and drainage pipework are any more than ¼-inch lower than the ruined floor , employ an extra thick wax gang . Otherwise , a stock wax band should form .
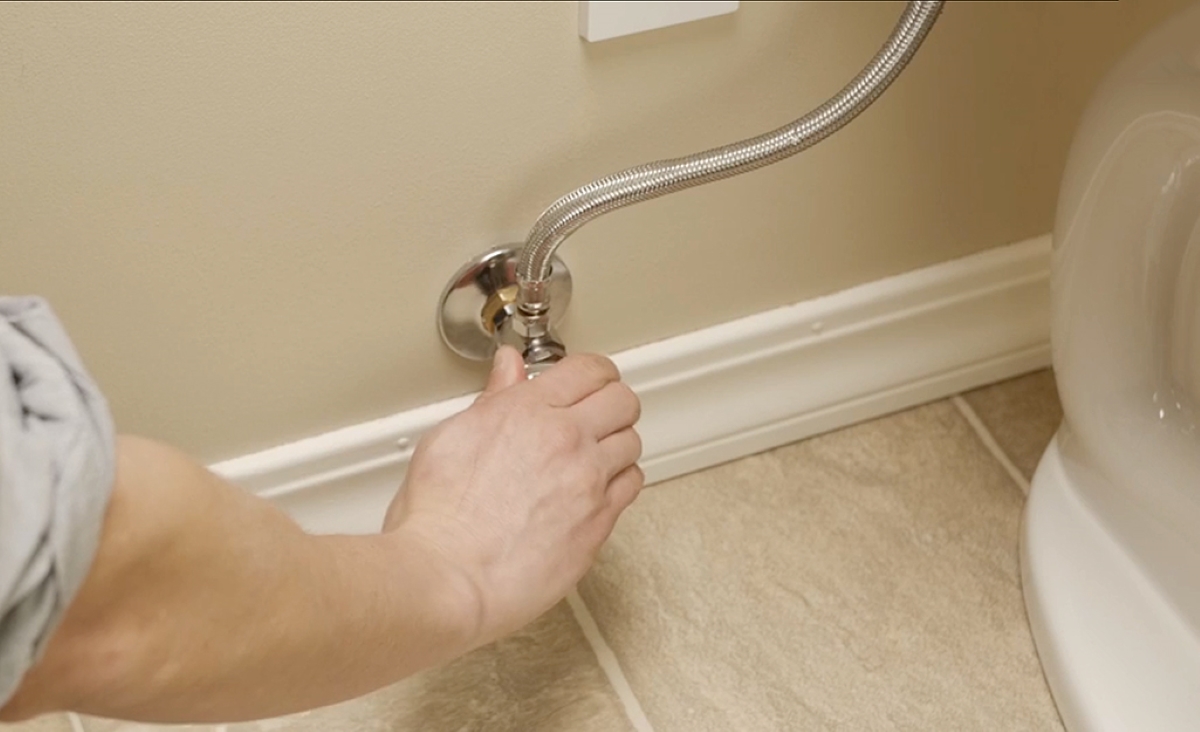
Photo: The Home Depot
Step 1: Shut off the water supply and drain the toilet.
The first pace to change awax ringis to shut off the body of water provision . Typically , there will be a braided steel hosiery running from the bottom of the toilet tank to a valve on the wall . Turn that valve clockwise until the tank car no longer fill again after flushing .
keep back the flush lever down until the tank empties as much as possible . Next , employ the plunger to fight as much of the water remain in the toilet down and into the drain pipage . This wo n’t likely get all of the piss , but it ’s possible to get most of it . Some may also choose to pluck up the residual water inside the sports stadium with a towel .
Step 2: Remove the supply line.
Remove the provision line from the underside of the sewer . In many face , this hosiery may be only hand - pie-eyed , so attempt to remove it with bare hands first . If that does n’t turn , utilise the pliers .
Turn the plastic nut ( or brass instrument nut , in some cases ) counterclockwise until the hose becomes sluttish . Be trusted to have the pocket-size bucket on hand and tuck the oddment of the supply line into it after it ’s removed to becharm any residuary water system snare in the air .
Step 3: Remove the anchor bolts.
The lynchpin bolts are the two pieces of hardware that hold the toilet to the trading floor . There is one on either side of the lav , and they ’re unremarkably covered with credit card caps . Use the flat mind screwdriver to kill the caps off of the bolt , uncover the nut and automatic washer on each .
Use the adjustable spanner to relax and remove the nut . In cases where the deadbolt keeps spinning , grab the threads with a pair of pliers to hold it in topographic point . There are replacement bolt in the wax ring kit , so do n’t occupy about vanquish the threads .
Once the en are off , slide the moldable washer up off of the bolts .
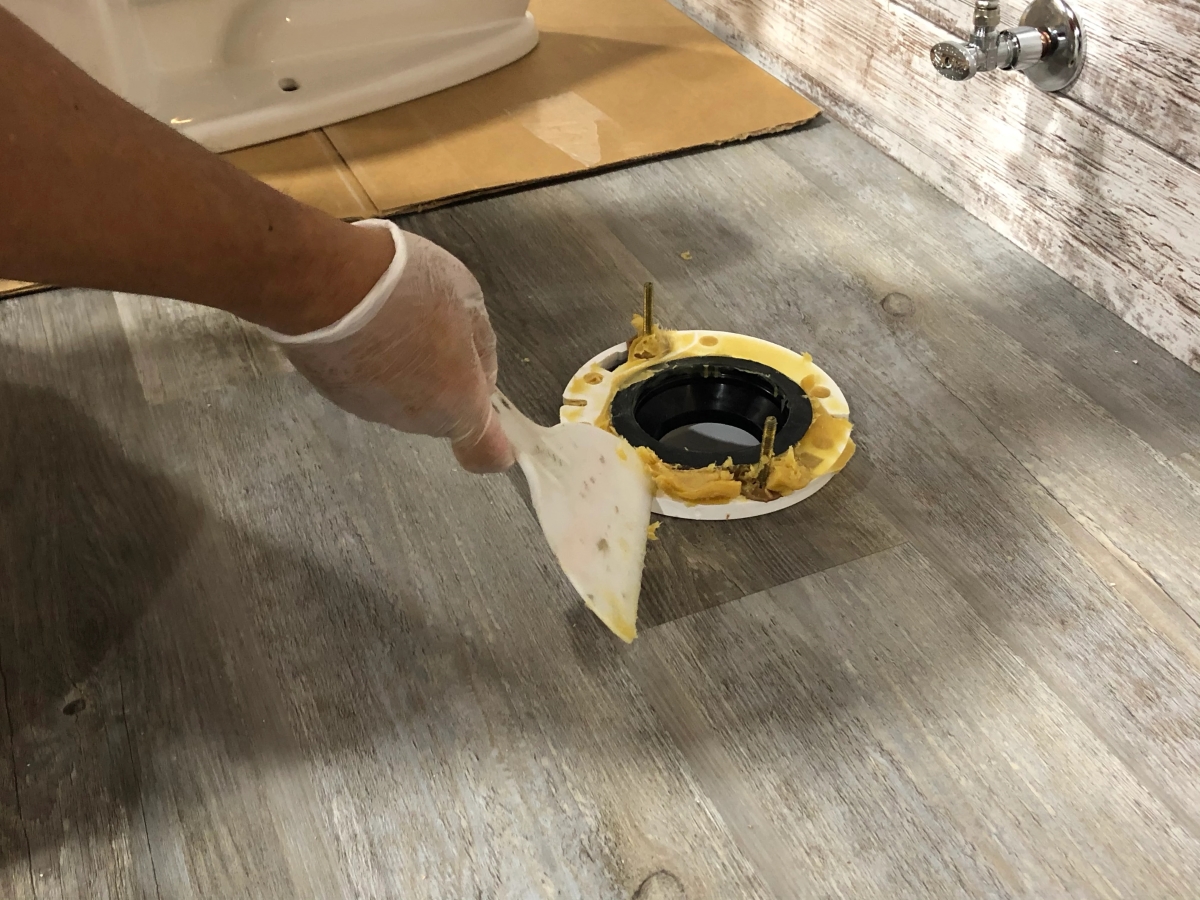
Photo: Oatey Photo: oatey.com
Step 4: Remove the toilet.
Fold a large towel into quarters and lay it on the base a few feet from the crapper and next to a wall or other sturdy vertical surface . This is where the toilet will sit down after it ’s removed ; the towel will cushion it and soak up any leaks .
put up over the toilet with one leg on each side , bend down and snap up the undersurface of the toilet , close to the storage tank . With a straight back and bent legs , stand up to bump off the toilet from the flange . It may feel slightly stuck at first ( thanks to our friend the wax pack ) , but it should come loose .
Without putting the toilet down , shuffle over to the towel . Place the stool on top . It ’s easy to equilibrate the pot on the towel by angle it slightly against a rampart or bathtub .

Step 5: Remove the old toilet gasket seal residue.
The wax closed chain might be attached to the undersurface of the toilet , impound to the flooring rim , or a little bit of both . expend the putty knife to scrape any lump of wax from the underside of the toilet and the pipe . It has to be all removed for the new wax ring to work right .
Once the major chunks are clean , use the degreaser to clean house the organ pipe and the underside of the can . These surfaces must be as clean as possible so the raw ring can bind .
Step 6: Inspect the flange and repair it (optional).
Look nearly at the floor flange . If there are snap , aeroembolism , or any signs of unreasonable wear , it ’s secure to plainly repair the flange before installing the unexampled wax ring .
There are several eccentric of mending flanges . Some slide into the existing pipage and then screw to the other floor . Others are unsubdivided thin metallic element crustal plate that model over the existing rim and then screw to the floor . Others may be hinge or derive with metal trading floor bracket . Whichever eccentric is chosen , surveil the manufacturer ’s instruction for installation .
Tried-and-True Advice
“ Beyond the steps include in this template , it ’s deserving thinking about what sort of wax ring you want to utilise for your toilet . There are legion choice out there today , including not only wax ring but also ‘ wax - spare ’ gasket and elastomer seal that purport to be more effective and leisurely to establish than schematic wax models .
In my experience , the efficaciousness of these alternatives varies — I once tried a democratic condom gasket that failed to seal on my rear - ride throne . In most case , a proficient previous wax sealing wax is still your serious bet . But even those can vary in invention and make-up , so it ’s worth doing some research beforehand to figure out which one will put to work best with your setup . ”
— Chase Brush , Contributing Writer
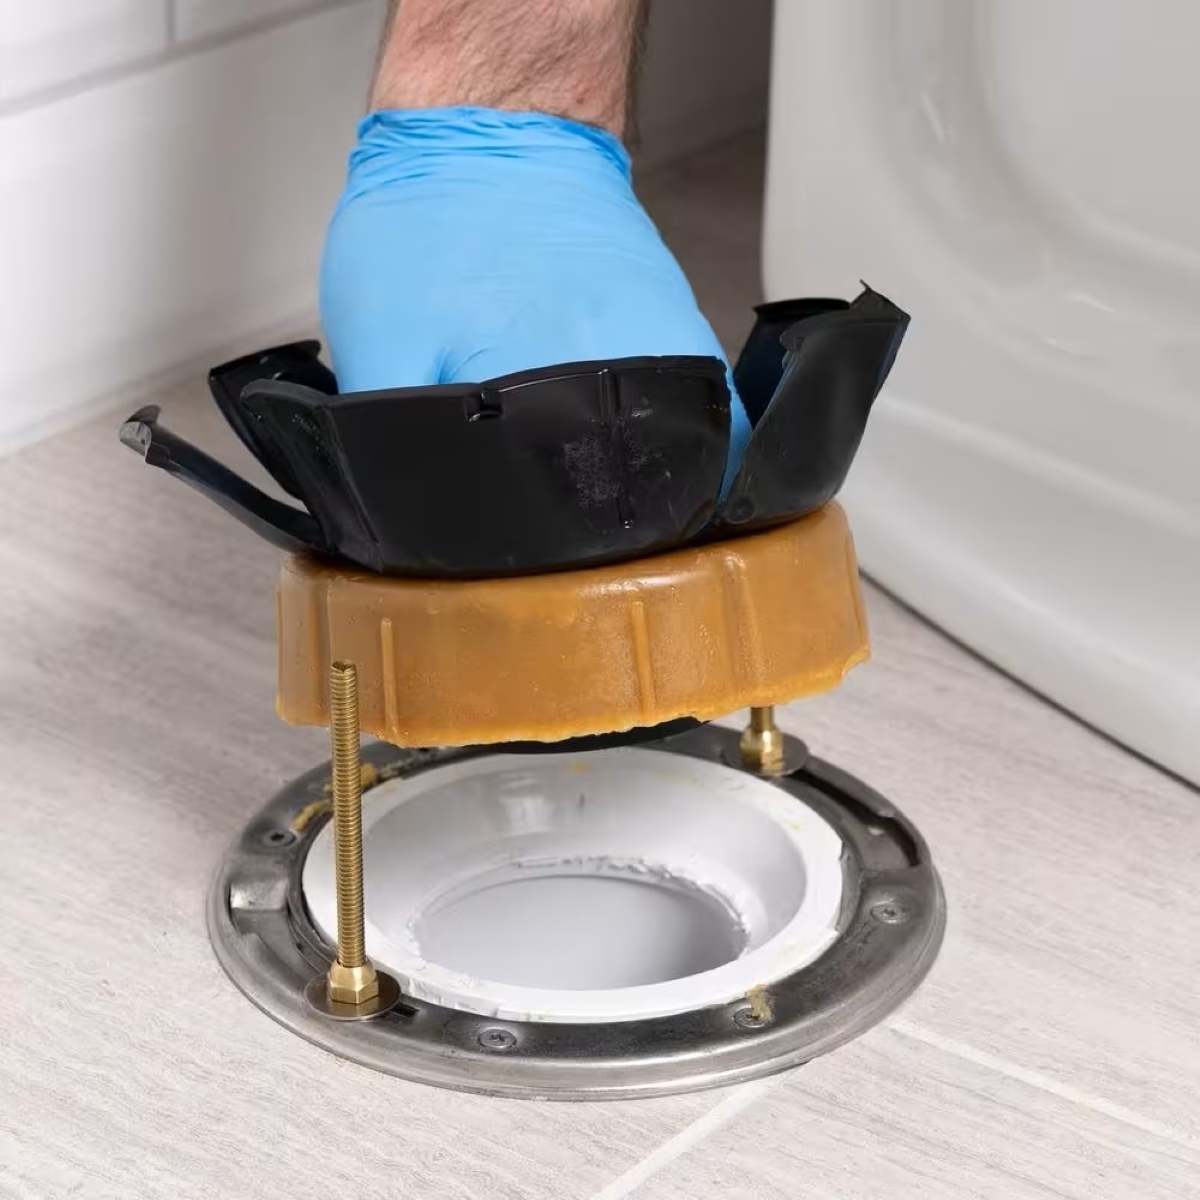
Photo: The Home Depot Photo: homedepot.com
Step 7: Install the new flange bolts.
The new wax anchor ring replacement kit should come with new flange bolt . Remove them from the packaging and slither their heads into the slot on either side of the trading floor flange . The friction - scene credit card washers slew down over the top of the threads and hold the ground tackle thunderbolt in spot and upright .
These bolt should be on either side of the rim , left and right , at 3 o’clock and 9 o’clock . Be certain to practice the pliant washing machine to hold up them in place .
Step 8: Install the wax ring.
There are two way to set up the wax closed chain . Either method acting works .
In either method , it ’s important that the toilet and rim are fair and centered . Being off to one side or the other could squeeze too much wax out one side and destroy the seal . It can also cause a partial blockage and qualify stream .
Step 9: Reinstall the toilet.
Standing over the top of the toilet , snaffle the underside of the throne . exert a square back and using leg power , rise the toilet and shuffle it over to the drain . Hover it over the drainpipe and grim it so the anchorperson bolts slide up into the mounting holes . This may take more than one attempt ; be careful not to ruin the wax ring in the physical process .
Once thetoilet is back in office , baby-sit down on the lid to pack together the wax ring and organize the seal .
Step 10: Secure the toilet.
Place the wide credit card , nylon , or report washer that fare in the wax anchor ring kit over each of the bolts . Thread a ballock onto each bolt of lightning and stiffen until the toilet does n’t tilt . Do not over - tighten or the porcelain base could crack .
After the toilet is secure , rate the charge card caps on the bolts . Then , reattach the supply hose . stiffen the hosepipe , turn on the supply water , and check for leaks . Also , considercaulking around the base of the toiletto finish the job .
Final Thoughts
replace a wax anchor ring on a toilet is not a unmanageable chore , but it must be done correctly to ensure there is a watertight cachet . With these tips , that Modern wax ring will take the day - to - day use dealt to it for years to come . Just be sure to clean the area where the old ring was attached , repair the flange if necessary , and cautiously ordinate the commode while supplant it for the just resultant .
Everything You Need for a Lush and Healthy Lawn
maintain your skunk green and your plants thrive does n’t just take a green thumb — it start up with the right tools and provision .
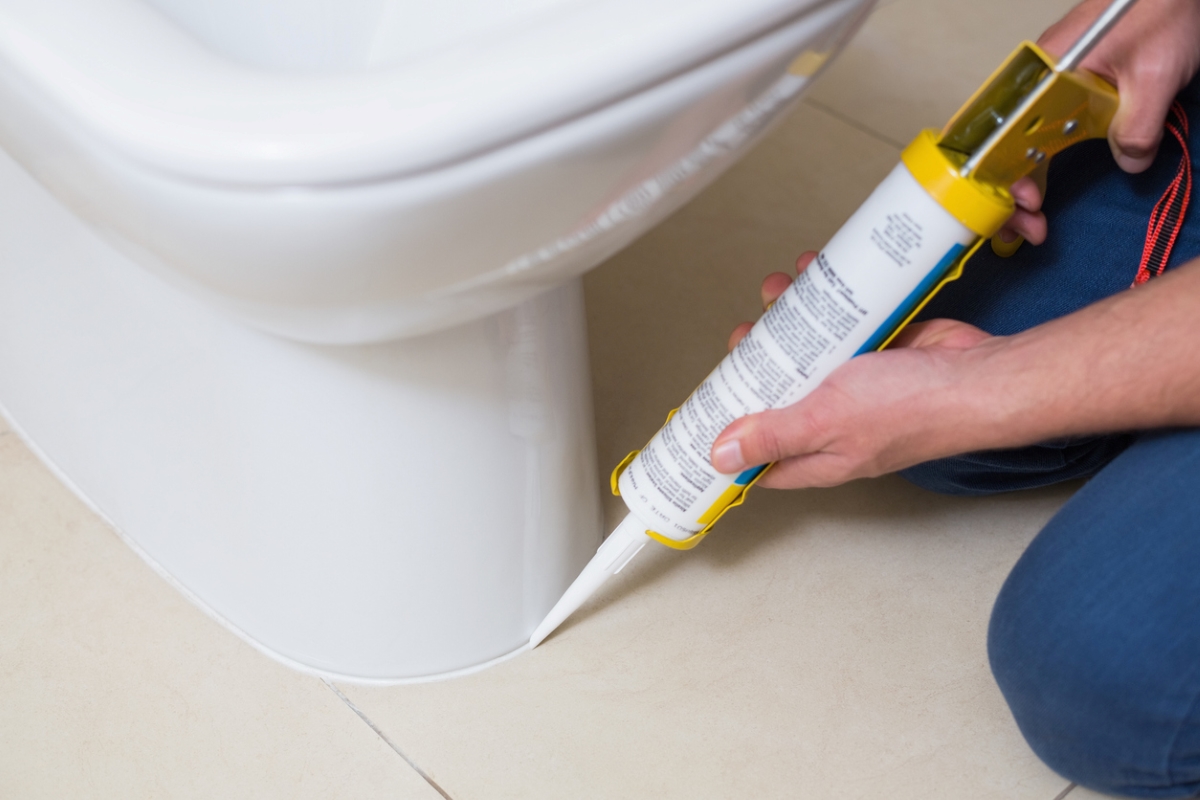
Photo: iStock Photo: istockphoto.com

